
 English
  日本語
日本語  Deutsch
  Español


How to Vacuum Seal a Jar: Step-by-Step Guide
Content
- 1 The Short Answer: How to Vacuum Seal a Jar
- 2 Why Vacuum Sealing a Jar Works — The Science Behind It
- 3 What You Need Before You Start
- 4 Method 1: Handheld Vacuum Pump with Jar Attachment
- 5 Method 2: FoodSaver Electric Vacuum Sealer with Jar Attachment
- 6 Method 3: Glass Vacuum Storage Jars with Built-In Pump Lids
- 7 Method 4: Boiling Water Bath (Traditional Canning Vacuum Seal)
- 8 What Foods Can You Vacuum Seal in a Jar?
- 9 How to Tell If Your Jar Is Properly Vacuum Sealed
- 10 Common Mistakes That Cause Vacuum Sealing to Fail
- 11 Choosing the Right Glass Vacuum Storage Jar for Your Needs
- 12 Vacuum Sealing Jars for Long-Term Food Storage and Prepping
- 13 Vacuum Sealing Jars for Everyday Kitchen Use
- 14 Vacuum Sealing Jars vs. Other Food Storage Methods
- 15 Frequently Asked Questions About Vacuum Sealing Jars
The Short Answer: How to Vacuum Seal a Jar
Vacuum sealing a jar removes the oxygen from inside the container, creating an airtight environment that dramatically slows food spoilage. The most reliable method involves a handheld vacuum pump with a jar sealer attachment — you place the attachment over the lid, pump out the air, and the lid locks down tight within seconds. No special machine required, no heat involved, and the result keeps dry goods, herbs, coffee, nuts, and many other foods fresh for 3 to 5 times longer than standard storage.
Beyond the pump method, there are several other approaches — FoodSaver vacuum sealers with jar attachments, the boiling water lid method for canning, and even a few DIY tricks using dry ice or CO₂ displacement. Each method suits different situations. This guide walks through all of them in practical detail so you can choose what works for your kitchen and your storage goals.
The container itself matters just as much as the method. A Glass Vacuum Storage Jar — typically made from borosilicate or tempered soda-lime glass with a rubber-sealed lid — gives you the best combination of airtight performance, chemical neutrality, and long-term durability. Glass doesn't absorb odors, doesn't leach plasticizers into food, and lets you see exactly what's inside without opening the jar.
Why Vacuum Sealing a Jar Works — The Science Behind It
Oxygen is the primary driver of food degradation. It fuels oxidation reactions that turn fats rancid, causes color changes in fruits and vegetables, supports mold and aerobic bacteria growth, and accelerates the breakdown of vitamins and aromatic compounds. Standard atmospheric air contains roughly 21% oxygen. When you vacuum seal a jar, you reduce that oxygen level to somewhere between 0.5% and 2%, depending on the method and the seal quality.
At those oxygen levels, aerobic spoilage organisms — the bacteria and molds that need air to survive — cannot thrive. Oxidative rancidity in oils and fatty foods is almost entirely halted. The aromatic volatile compounds in coffee, herbs, and spices are far less likely to off-gas and dissipate into the surrounding air. The result is food that stays closer to its original state for far longer than conventional storage allows.
It's worth understanding what vacuum sealing does not do. It does not sterilize food. Anaerobic bacteria such as Clostridium botulinum can still grow in a low-oxygen environment if moisture is present. This is why vacuum sealing works best for dry goods, and why any vacuum sealing of moist or low-acid foods should involve proper canning procedures with heat processing — not just a pump and a lid.
A Glass Vacuum Storage Jar is particularly effective for this process because glass is non-porous and impermeable. Plastic containers, even food-grade ones, allow a small but measurable rate of oxygen permeation through the walls over time. Glass does not. Once you pull a vacuum in a glass jar and the lid seals properly, the internal atmosphere stays stable until you open it.
What You Need Before You Start
Getting vacuum sealing right starts with having the correct equipment. Using the wrong jar or the wrong lid is one of the most common reasons people end up with a failed seal. Here's what to gather before you begin:
Jars
Mason jars (Ball, Kerr, or equivalent) are the standard for vacuum sealing with pump attachments or FoodSaver systems. They come in wide-mouth and regular-mouth versions; wide-mouth jars are easier to fill and clean. Purpose-built glass vacuum storage jars with integrated rubber gasket lids are another excellent option — these don't require a separate attachment and are designed specifically for long-term airtight storage. Jars should be free of chips, cracks, or scratches around the rim, as these prevent a proper seal.
Lids
For Mason jars, always use new, unused flat lids. The sealing compound on the underside of the lid is a one-use material — once it has been compressed by a previous seal, it will not create a reliable vacuum the second time. Bands (the screw rings) can be reused, but the flat lids should be fresh for every vacuum seal attempt.
Vacuum Pump or Sealer
Your main options are:
- A handheld manual vacuum pump with a wide-mouth or regular-mouth jar sealer attachment. These cost between $10 and $30 and require no electricity.
- A FoodSaver or similar electric vacuum sealer with a jar sealer accessory hose. These are faster, more consistent, and better suited for high-volume sealing.
- An electric handheld jar vacuum sealer — a newer category of compact rechargeable devices that sit directly on the jar lid and pump automatically. Brands like Zwilling Fresh & Save and several others make these.
Optional but Useful
- Oxygen absorbers (for extra protection in long-term dry food storage)
- Food-grade desiccant packets (for moisture-sensitive items like crackers or dried herbs)
- A permanent marker or label tape for dating jars
- A clean, lint-free cloth for wiping jar rims before sealing
Method 1: Handheld Vacuum Pump with Jar Attachment
This is the easiest and most accessible method. A handheld pump with a jar sealer attachment costs very little and works with standard Mason jars. Here's exactly how to do it:
- Fill the jar with the food you're storing. Leave about 1 inch (2.5 cm) of headspace at the top — this gives the lid room to seat and allows for pressure equalization.
- Wipe the jar rim with a clean, damp cloth. Any crumb, oil residue, or debris on the rim will prevent a proper seal.
- Place a new flat lid on the jar. Do not attach the band yet — the lid should just rest loosely on top.
- Place the jar sealer attachment over the lid. For wide-mouth jars, use the wide-mouth attachment; for regular-mouth jars, use the standard attachment. Press it down firmly so it sits flush.
- Connect the tubing from the pump to the attachment (on models that use separate tubing), or if the attachment is integrated, begin pumping.
- Pump steadily, typically 8 to 12 strokes, until you feel strong resistance. This resistance indicates that most of the air has been removed and the lid is being held down by the pressure differential.
- Remove the attachment carefully, pressing slightly inward as you lift to avoid disturbing the seal.
- Press down on the center of the lid with your finger. If it doesn't flex or make a clicking sound, the vacuum seal is intact. A properly sealed lid should be rigid and slightly concave in the center.
- Screw the band on fingertip-tight. The band is just for transportation security — it does not create the seal itself.
- Label the jar with the contents and the date.
If the center of the lid flexes when pressed or pops back up, the seal has failed. This usually means the rim wasn't clean enough, the lid is damaged, or the attachment wasn't held firmly during pumping. Remove the lid, inspect the rim and lid carefully, then try again with a new lid.
Method 2: FoodSaver Electric Vacuum Sealer with Jar Attachment
FoodSaver machines are primarily designed for vacuum sealing bags, but with the jar sealer accessory (sold separately or included with some models), they work very well with Mason jars. The electric motor produces a stronger, more consistent vacuum than a manual pump, which can be particularly useful for sealing larger jars or doing multiple jars in a session.
- Connect the accessory hose to the port on your FoodSaver machine. Most models have an accessory port labeled with a small circle or "ACC."
- Fill the jar and wipe the rim as described above. Place a new flat lid on top without the band.
- Place the jar sealer attachment over the lid and connect the accessory hose to the top of the attachment.
- Press the "Seal" or "Accessory" button on your FoodSaver. The machine will run for approximately 20 to 40 seconds, depending on jar size, then stop automatically when the target vacuum level is reached.
- Disconnect the hose by pressing the release button on the attachment. Remove the attachment.
- Check the seal by pressing the lid center, then screw on the band and label as normal.
One important note: the FoodSaver jar attachment comes in two sizes — wide-mouth and regular-mouth. Confirm which size your jars require before purchasing. Using the wrong size will result in an incomplete seal every time.
The electric method is particularly well-suited for batch sealing — if you're packing 10 or 20 jars of dried goods at once after a bulk pantry restock, the FoodSaver is considerably faster than manual pumping.
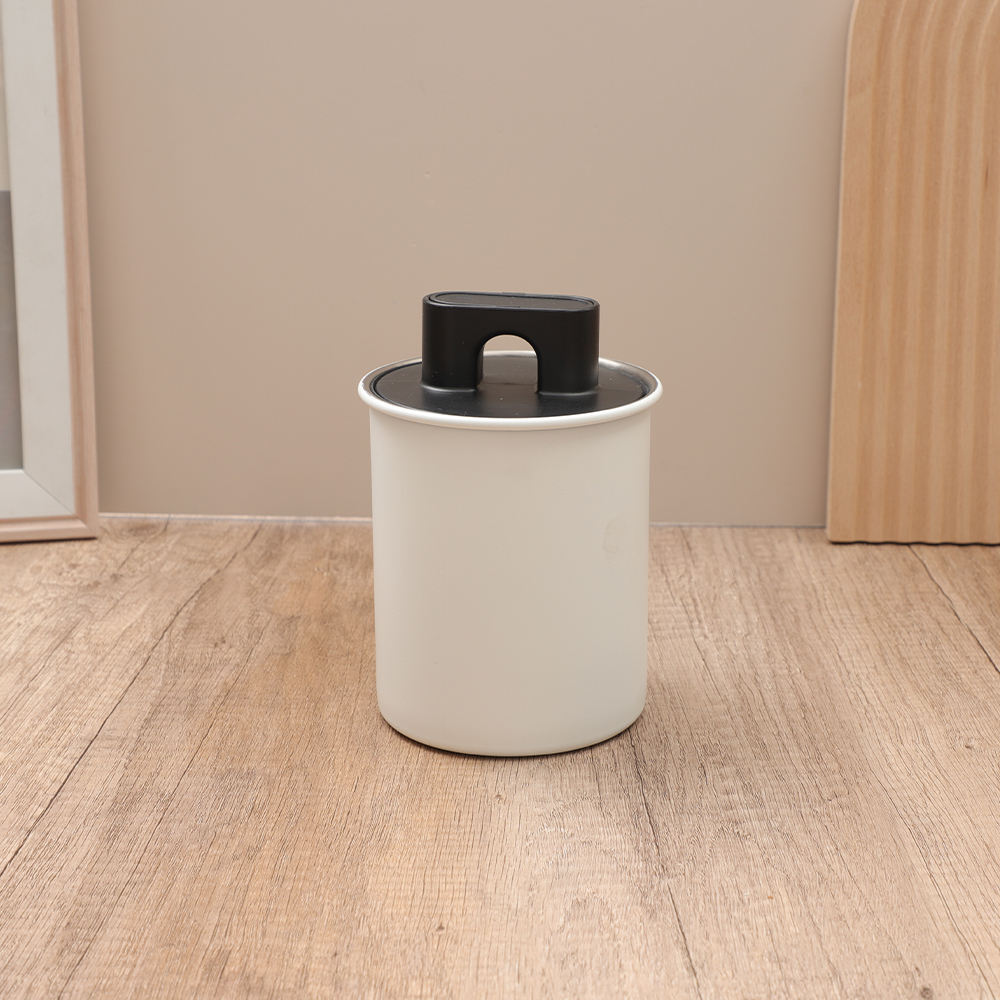
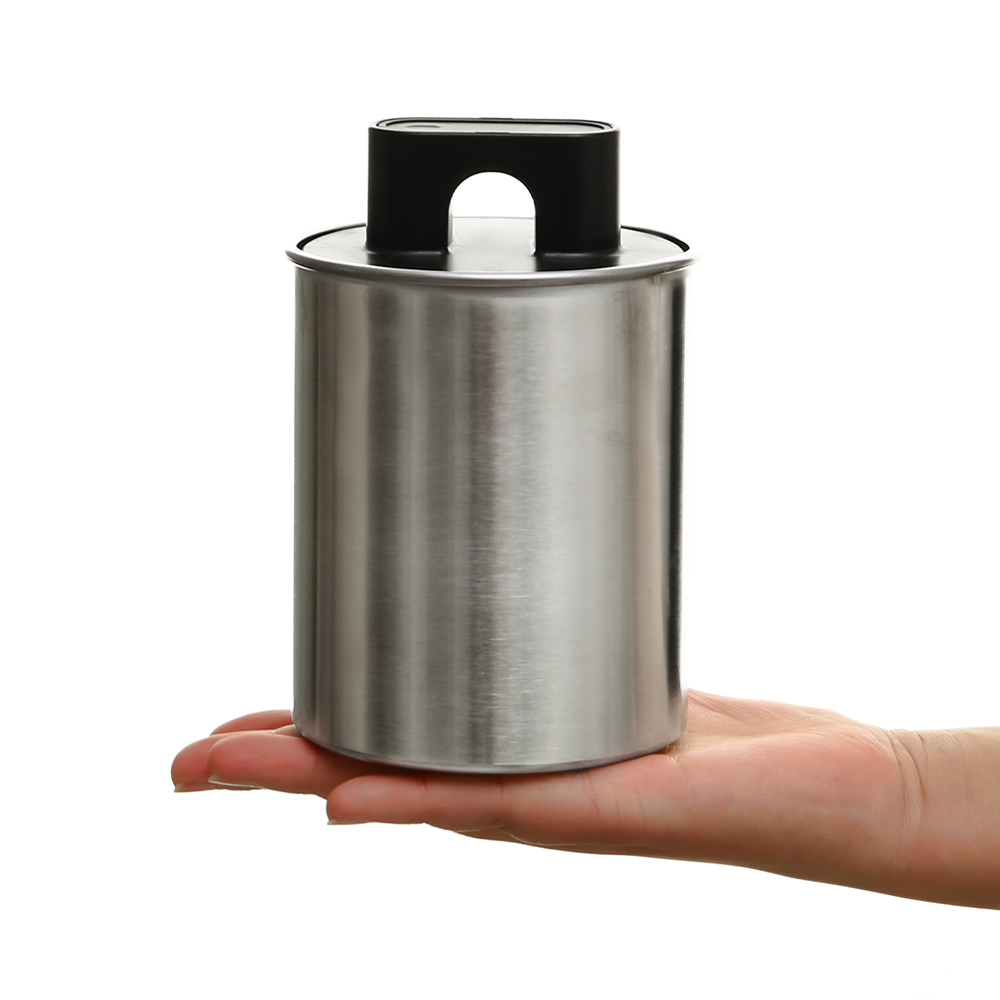
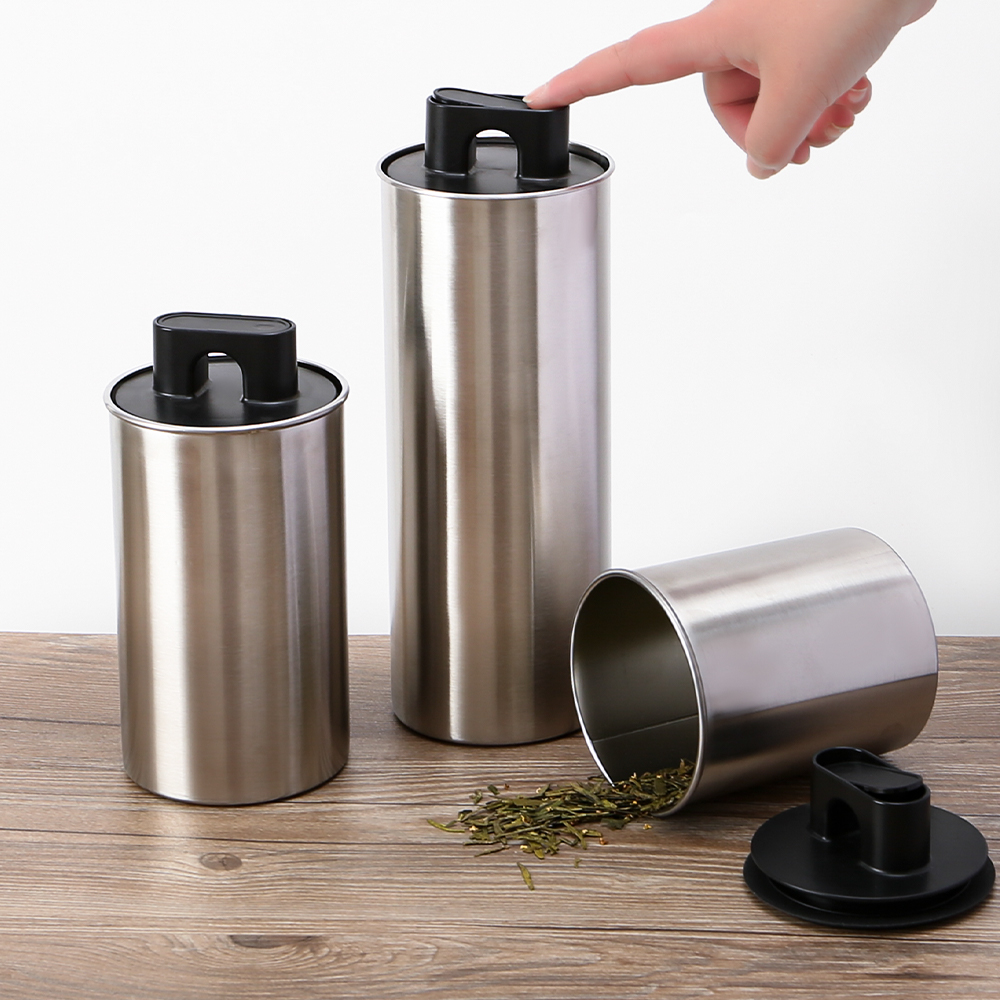
Method 3: Glass Vacuum Storage Jars with Built-In Pump Lids
A purpose-built Glass Vacuum Storage Jar with an integrated pump mechanism simplifies the process considerably. These containers — sold under various brand names including OXO, Zwilling, Kilner, and others — feature lids with a built-in hand pump or a valve port compatible with an electric pump. The rubber gasket seal creates an airtight barrier without requiring a separate Mason jar lid system.
The process with these jars is straightforward:
- Fill the jar, leaving appropriate headspace (check the manufacturer's recommendation, usually ¾ to 1 inch).
- Close the lid and ensure the rubber gasket is seated correctly in its groove.
- On models with a hand pump on the lid, pump the integrated plunger 5 to 10 times until you feel resistance.
- On models with a valve port, attach your compatible pump or the provided electric pump, activate it, and wait for the indicator to signal a full vacuum.
- Some models include a visual vacuum indicator — a small button or dial on the lid that pops down when a vacuum is achieved and pops back up when the seal breaks upon opening.
The advantage of a dedicated glass vacuum storage jar over the Mason jar approach is convenience and reusability of the entire lid system. The tradeoff is cost — a quality set of vacuum glass jars costs significantly more upfront than buying Mason jars and a pump separately. However, for everyday countertop use storing coffee, tea, nuts, or pasta, the all-in-one format is genuinely more practical for most kitchens.
Method 4: Boiling Water Bath (Traditional Canning Vacuum Seal)
The traditional canning method creates a vacuum seal through heat. As hot food cools inside a sealed jar, the steam condenses and contracts, pulling the lid down and creating a partial vacuum. This method is used for jams, pickles, sauces, and other processed foods — it's not generally applicable to dry goods but is worth understanding for anyone doing home food preservation.
- Sterilize jars and lids according to USDA guidelines — typically by boiling jars for 10 minutes.
- Fill jars with hot food, maintaining the headspace specified in your recipe (usually ¼ to ½ inch for high-acid foods).
- Wipe jar rims, apply lids and bands fingertip-tight.
- Process jars in a boiling water bath for the time specified in your canning recipe.
- Remove jars and let cool undisturbed for 12 to 24 hours.
- After cooling, check each seal by pressing the lid center. A properly sealed lid will be concave and rigid. Any lid that flexes or pops is unsealed and must be refrigerated and used promptly.
This method should only be used with tested, USDA-approved canning recipes for high-acid foods (pH below 4.6) such as fruits, pickles, and tomatoes. Low-acid foods like vegetables, meat, and beans require pressure canning at higher temperatures to eliminate the botulism risk — a boiling water bath does not get hot enough to destroy Clostridium botulinum spores in low-acid environments.
What Foods Can You Vacuum Seal in a Jar?
Not every food is a good candidate for vacuum jar sealing. The method works best for foods where oxygen is the primary cause of spoilage or quality degradation. The table below outlines which foods benefit most and what shelf-life improvements you can realistically expect:
| Food Item | Standard Shelf Life | Vacuum Sealed Shelf Life | Notes |
|---|---|---|---|
| Whole coffee beans | 2–4 weeks | 3–6 months | Freshly roasted beans off-gas CO₂; wait 24–48 hrs before sealing |
| Nuts (walnuts, almonds) | 1–3 months | Up to 12 months | High fat content makes them prone to rancidity without vacuum sealing |
| Dried herbs and spices | 6–12 months | 2–5 years | Potency and color preserved significantly longer |
| White rice / dried grains | 1–2 years | 5–10+ years | Best combined with oxygen absorbers for longest storage |
| Dried pasta | 1–2 years | 3–5 years | Maintain low humidity in storage environment |
| Dried beans / lentils | 1–2 years | 4–6 years | Cooking time may increase with very long storage |
| Brown sugar / salt / sugar | Indefinite (clumping) | Stays free-flowing longer | Vacuum removes moisture, preventing clumping |
| Fresh berries (refrigerated) | 3–5 days | 7–11 days | Must stay refrigerated; vacuum slows mold but doesn't eliminate it |
Foods that are not well-suited for vacuum sealing in jars include: soft cheeses and raw meat (which require refrigeration and specific safety protocols regardless of sealing), carbonated beverages (the CO₂ will fight the vacuum), and items with very high moisture content at room temperature, where anaerobic spoilage risk is a real concern.
How to Tell If Your Jar Is Properly Vacuum Sealed
A failed seal is easy to miss if you don't know what to look for. Here are the reliable ways to confirm a proper vacuum before putting your jars away:
The Press Test
Press the center of the lid firmly with your fingertip. A properly sealed lid will feel solid and rigid — it will not flex, bend, or make any clicking sound. If the lid gives way and clicks when pressed (the familiar "pop" of a mason jar), the vacuum has failed or was never established.
Visual Inspection
Look at the lid from the side. A vacuum-sealed Mason jar lid will be slightly concave — curving downward in the center rather than sitting flat or doming upward. This concavity is caused by the atmospheric pressure on the outside exceeding the pressure inside the jar, physically pressing the lid inward.
The Tap Test
Tap the center of the lid with a metal spoon. A properly sealed lid produces a high-pitched, clear ringing tone. An unsealed lid produces a dull, hollow thud. This takes a little practice to distinguish by ear, but once you've heard both sounds side by side, the difference is immediately obvious.
Vacuum Indicator Buttons
Many purpose-built glass vacuum storage jars include a colored indicator button on the lid. When the button is pressed down (typically green side visible or depressed), the vacuum is intact. When it pops back up, the seal has been broken — either intentionally when you open the jar or because the seal has failed.
Common Mistakes That Cause Vacuum Sealing to Fail
Most vacuum sealing failures come down to a handful of very preventable errors. Understanding these helps you seal jars correctly from the start rather than discovering the problem weeks later when food has gone stale.
- Dirty jar rims. Even a tiny amount of oil, powder, or food debris on the sealing surface of the rim will create a gap that prevents an airtight seal. Always wipe rims with a clean, damp cloth immediately before placing the lid.
- Reusing flat lids. The sealing compound on Mason jar lids is designed for a single use. A lid that has previously been sealed — even if it looks fine — may not create a reliable vacuum a second time.
- Chipped or cracked jar rims. A chip in the glass sealing surface creates a channel for air to enter regardless of how good your lid is. Inspect every jar rim visually and by running a finger along the edge before use. Discard any jar with rim damage.
- Overfilling the jar. Leaving insufficient headspace means food particles can contact the lid's sealing compound, contaminating it and preventing a proper seal.
- Sealing moist or warm food. Steam and moisture vapor inside a jar will work against the vacuum over time. Make sure food is completely dry and at room temperature before vacuum sealing dry goods.
- Mismatched attachment size. Using a wide-mouth attachment on a regular-mouth jar (or vice versa) is an extremely common beginner mistake. The attachment will sit on top of the band rather than the lid and will not create a vacuum.
- Stopping pumping too early. With manual pumps, people often stop at the first sign of resistance rather than continuing until the resistance is truly firm. Push through to a strong, consistent resistance level before removing the attachment.
Choosing the Right Glass Vacuum Storage Jar for Your Needs
Not all glass vacuum storage jars are made equal. If you're investing in dedicated vacuum storage containers rather than using Mason jars with a pump attachment, here are the factors worth evaluating:
Glass Type
Borosilicate glass is more resistant to thermal shock than standard soda-lime glass — meaning it's less likely to crack if you move it from a cold refrigerator to a warm countertop. For pantry storage at stable temperatures, either type works fine. For refrigerator or freezer use, borosilicate is worth the extra cost.
Lid and Gasket Quality
The rubber or silicone gasket is the most critical part of a vacuum storage jar's lid. Silicone gaskets are more durable and hold up better to repeated use and occasional dishwasher cleaning compared to natural rubber. Check whether replacement gaskets are available for purchase — a jar whose gasket degrades and can't be replaced becomes useless as a vacuum container.
Pump Mechanism Compatibility
Some glass vacuum storage jars use proprietary pump attachments that only work with the brand's own pump. Others use a standard valve compatible with multiple third-party pumps. If you want flexibility — particularly the ability to use a FoodSaver or other electric vacuum sealer — look for jars with a standard valve port rather than a proprietary system.
Size Range
A good set of glass vacuum storage jars should include multiple sizes. Smaller jars (250–500ml) work well for herbs, spices, coffee, and nuts. Medium jars (750ml–1L) suit pasta, rice, cereals, and granola. Larger jars (1.5L–2L and above) are useful for bulk grains, dried beans, or batch-prepared foods. Buying a mismatched single size will either waste space or require cramming too much into too small a container, both of which compromise the vacuum sealing process.
Dishwasher Safety
Check whether both the jar and the lid components are dishwasher safe. Many glass jars are fine in the dishwasher; many lids with integrated pumps or electronic components are not. If hand-washing lids is a dealbreaker for your kitchen routine, prioritize brands that explicitly confirm full dishwasher compatibility.
Vacuum Sealing Jars for Long-Term Food Storage and Prepping
For people interested in long-term food storage — whether for emergency preparedness, bulk buying, or homesteading — vacuum sealing glass jars is one of the most cost-effective and reliable storage strategies available. When combined with the right environmental conditions and additional oxygen absorbers, vacuum-sealed glass jars can extend the shelf life of staple dry foods to a degree that most people find surprising.
The key variables for maximum shelf life are:
- Temperature: Every 10°F (5.5°C) drop in storage temperature roughly doubles shelf life. A pantry at 55°F (13°C) will keep vacuum-sealed food far longer than a pantry at 75°F (24°C). Basement or root cellar storage significantly outperforms a kitchen cupboard for long-term storage.
- Light exposure: UV light degrades fats, vitamins, and color in food. Store jars in a dark location, or use amber or opaque jars for light-sensitive foods like oils and herbs. Clear glass jars should be kept in dark cupboards or pantries, not on open shelving exposed to sunlight.
- Oxygen absorbers: Adding a 100–300cc oxygen absorber to a vacuum-sealed jar before sealing provides an additional layer of protection, reducing residual oxygen to near zero. This is particularly valuable for long-term storage of 5+ years.
- Food moisture content: Food should be at or below 10% moisture content for safe long-term vacuum storage. Higher moisture levels invite anaerobic bacterial growth. Commercial dehydrators or food moisture meters can help verify this for home-dried foods.
One practical prepping strategy is to purchase staple foods in bulk from warehouse stores or online — white rice, dried beans, oats, flour, sugar, salt, dried lentils — and repackage them into vacuum-sealed glass jars in portion sizes appropriate for your household. This both extends shelf life and keeps your pantry organized with clearly labeled, uniform containers that are easy to rotate on a first-in, first-out basis.
Vacuum Sealing Jars for Everyday Kitchen Use
Long-term prepping is one use case, but the more immediate everyday value of vacuum sealing jars is in routine kitchen management. Many common foods that people discard prematurely due to staleness or spoilage are excellent candidates for vacuum jar storage.
Coffee
Coffee is extremely sensitive to oxygen. Whole beans begin losing peak flavor within days of exposure to air. Vacuum sealing in a glass vacuum storage jar maintains freshness for 3 to 6 months at room temperature — a dramatic improvement over an open or loosely sealed bag. Note that freshly roasted beans should off-gas for 24 to 48 hours before sealing, as residual CO₂ outgassing can undermine the vacuum.
Nuts and Seeds
Walnuts, pecans, and other high-fat nuts go rancid quickly at room temperature due to oxidative fat breakdown. Vacuum sealing extends their shelf life from a few months to close to a year at room temperature, or much longer if vacuum sealed and then refrigerated.
Fresh Produce (Refrigerator)
Sliced fruits, leafy greens, and cut vegetables stored in a vacuum-sealed glass jar in the refrigerator stay fresh noticeably longer than those stored in open containers or plastic bags. Berries are a particularly dramatic example — strawberries stored in a vacuum-sealed glass jar in the fridge routinely last 7 to 10 days versus 3 to 5 days in a standard container.
Leftover Sauces and Prepared Foods
Vacuum sealing leftover pasta sauces, soups, or cooked grains in glass jars before refrigerating them can extend their safe, good-quality window by a day or two compared to loosely covered containers. This is particularly useful for meal preppers who cook in large batches on weekends and want food to stay at its best through the work week.
Vacuum Sealing Jars vs. Other Food Storage Methods
It helps to understand where vacuum sealing jars fits in relation to other common storage approaches so you can make smart decisions about when and how to use each method:
- Vacuum seal bags vs. glass jars: Bags are more flexible and can conform to irregular food shapes. Jars are reusable, glass-safe (no chemical migration), and resealable after opening. For long-term pantry storage, jars win on sustainability and food safety. For freezer storage of meat and irregular items, bags have a practical advantage.
- Vacuum sealed jars vs. mylar bags with oxygen absorbers: Mylar bags with oxygen absorbers achieve a higher level of oxygen exclusion (often below 0.1%) and are lighter and cheaper for bulk storage. However, they are not reusable, not transparent, and less practical for foods you access frequently. Glass vacuum jars are better for regular-use pantry items; mylar is better for extreme long-term archival storage.
- Vacuum sealed jars vs. airtight containers without vacuum: Standard airtight containers (like OXO Pop containers) significantly reduce air exposure but don't remove the existing oxygen inside. Vacuum sealing removes most of that residual oxygen, making it meaningfully more effective for foods where oxidation is the main concern.
- Vacuum sealed jars vs. freezing: Freezing halts almost all biological spoilage but affects texture — particularly for soft fruits, herbs, and certain vegetables. Vacuum jar storage preserves texture for dry goods while not requiring freezer space. For moist foods where texture preservation matters, freezing plus vacuum sealing together (using a freezer-safe glass jar) is the most effective approach.
Frequently Asked Questions About Vacuum Sealing Jars
Can you vacuum seal a jar without a special machine?
Yes. A simple handheld manual pump with a jar attachment costing under $20 is all you need. No electricity, no special equipment. The pump-and-attachment method works reliably for most dry-food vacuum sealing applications.
How long does a vacuum seal last on a jar?
A properly sealed jar that is left undisturbed in a stable environment can hold its vacuum for months to years. Jars should be checked periodically by pressing the lid center — if the lid still feels rigid and doesn't flex, the vacuum is intact. Any jar with a lid that has begun to flex should be checked for seal integrity and the contents inspected before use.
Can you vacuum seal liquids in a jar?
Technically yes, but with limitations. The pump method works for liquids in a jar, though it's less efficient than with dry goods because liquids can bubble up and contaminate the lid sealing surface if the jar is too full or the pump is applied too aggressively. For liquids like broth, sauce, or vinaigrette, leave plenty of headspace (at least 1.5 to 2 inches) and pump slowly.
Can you reuse vacuum-sealed jar lids?
For Mason jar flat lids: officially, no — the sealing compound is a one-use material. In practice, many people do reuse them for dry goods (not for canning) with reasonable success, but it's a risk not worth taking for important long-term stores. For purpose-built glass vacuum storage jar lids with silicone gaskets, the lids are designed to be reused repeatedly — that's the point of the system.
Is vacuum sealing in glass jars safe for all foods?
No. Low-acid moist foods — including cooked beans, meat, garlic in oil, and most vegetables — should never be vacuum sealed and stored at room temperature in a jar. The low-oxygen environment created by vacuum sealing is precisely the condition where Clostridium botulinum grows. These foods require refrigeration or proper pressure-canning procedures. Dry goods with low moisture content are safe; moist foods require additional precautions.
Recommended Products
")


")


- PRODUCT
- Glass Storage Jar
- Glass/Stainless Steel Drinking ware
- Kitchen Seasoning Containers
- Home Decoration
- QUICK LINKS
- Products
- About Us
- Manufacture
- ODM/OEM
- News
- Contact Us
- CONTACT US
-
-
 7 Crystal Boulevard xi’an Feng Town, Baoying County,Jiangsu, China.
 -
 WhatsApp: +86-18083783456
 -
 +86-18083766162
+86-18083783456
+86-15895746638
+86-0514-8866-8898
-
 julia@nchousewares.com
Jack@nchousewares.com
-
- CONTACT

