
 English
  日本語
日本語  Deutsch
  Español


How to Sanitize Jars for Canning: Complete Step-by-Step Guide
Content
- 1 The Short Answer: How to Sanitize Jars for Canning
- 2 Why Sanitizing Canning Jars Is Non-Negotiable
- 3 What You Need Before You Start
- 4 Step-by-Step: The Boiling Water Method (Most Reliable)
- 5 The Dishwasher Method: Convenient but With Conditions
- 6 The Oven Method: Use With Caution
- 7 Comparison of Sanitization Methods
- 8 How to Prepare Canning Lids Correctly
- 9 Altitude Adjustments for Jar Sterilization
- 10 Choosing the Right Glass Storage Jar for Canning
- 11 Common Mistakes That Compromise Jar Sterilization
- 12 Sanitizing Jars for Specific Types of Canning
- 13 How to Know If Your Jars Sealed Properly After Canning
- 14 Reusing Glass Storage Jars: What's Safe and What Isn't
- 15 Quick Reference: Sanitization Steps at a Glance
The Short Answer: How to Sanitize Jars for Canning
To sanitize jars for canning, wash them thoroughly with hot soapy water, then sterilize using one of three proven methods: boiling in water for 10 minutes, running through a hot dishwasher cycle, or heating in an oven at 225°F (107°C) for 20 minutes. The method you choose depends on the type of food you're preserving and the processing time required.
For any canned product processed for less than 10 minutes in a boiling water bath, jars must be pre-sterilized before filling. For products processed longer than 10 minutes, the processing time itself sterilizes the jar — but you still need to clean and heat them before use. Skipping sanitization is the leading cause of spoilage, mold, and dangerous bacterial growth including Clostridium botulinum, which produces the toxin responsible for botulism.
Using the right Glass Storage Jar matters just as much as the sterilization process itself. Canning-specific jars (such as mason jars or Ball jars) are designed to withstand repeated heat cycles. Repurposed commercial jars — like those from store-bought pasta sauce — are not recommended for home canning because their glass is thinner and more prone to cracking under pressure and temperature changes.
Why Sanitizing Canning Jars Is Non-Negotiable
Bacteria, yeast, and mold spores are present on every surface, including the inside of a glass jar that looks perfectly clean. When you fill a jar with food and seal it, you're creating an anaerobic (oxygen-free) environment — exactly the conditions that allow dangerous organisms to multiply rapidly if they aren't eliminated first.
According to the USDA Complete Guide to Home Canning, improper sterilization is directly linked to foodborne illness outbreaks every year. Botulism toxin is so potent that a single gram could theoretically kill over 1 million people — and low-acid foods like green beans, carrots, and meats are especially vulnerable because they lack the natural acidity to inhibit bacterial growth.
Even for high-acid foods like jams, jellies, and pickles — which are naturally more resistant to bacterial contamination — mold and yeast can still thrive on improperly cleaned surfaces and ruin an entire batch of preserves. Proper sanitization protects your investment of time, ingredients, and quality glass canning jars.
Beyond safety, sanitized jars also extend the shelf life of your preserved food. Properly sterilized and sealed home-canned goods stored in a cool, dark location can last 12 to 18 months while maintaining both safety and quality.
What You Need Before You Start
Before you begin the sanitization process, gather everything you need. Running back and forth mid-process increases the risk of re-contaminating jars or burning yourself on hot equipment.
- Canning-grade Glass Storage Jars (mason jars, Ball jars, Kerr jars, or equivalent)
- New, unused canning lids (flat lids with sealing compound)
- Canning bands/rings (can be reused if rust-free and undamaged)
- A large stockpot or water bath canner with a rack (holds jars upright during boiling)
- Jar lifter tongs (essential — do not attempt to remove hot jars with bare hands)
- Clean kitchen towels or a drying rack
- Hot, soapy water and a clean bottle brush
Always inspect every glass canning jar before use. Reject any jar with chips along the rim, hairline cracks, or deep scratches on the interior. Damage to the rim prevents proper sealing, and interior cracks can harbor bacteria even after sterilization. A jar that isn't structurally sound will also risk shattering during the canning process, which is both dangerous and wasteful.
New lids should be used every single time. The sealing compound on used lids may not form a reliable vacuum seal the second time around, which can allow air — and bacteria — back into the jar over time. Bands can be reused as long as they show no rust, dents, or warping.
Step-by-Step: The Boiling Water Method (Most Reliable)
The boiling water method is recommended by the USDA and National Center for Home Food Preservation. It's the most consistently effective approach for sterilizing glass jars for canning, and it's straightforward once you've done it a couple of times.
- Wash jars with hot soapy water. Use a bottle brush to scrub every interior surface. Rinse thoroughly to remove all soap residue, which can affect the taste of preserved food and interfere with the sealing process.
- Fill your canning pot with water. Place the rack in the bottom of a large stockpot and add enough water to cover the jars by at least 1 inch when submerged. Begin heating the water while you prepare the jars.
- Submerge the jars in the water. Place jars right-side up on the rack. If you place them upside down, water can get trapped inside and may not sterilize the interior fully. Keep them in boiling water for a minimum of 10 minutes. At altitudes above 1,000 feet, add 1 additional minute of boiling per 1,000 feet of elevation.
- Keep jars hot until filling. Turn the heat down to a low simmer and keep jars submerged until you're ready to fill them. Never fill a cold jar with boiling-hot food — the thermal shock can crack even thick glass canning jars.
- Remove jars one at a time. Use jar lifter tongs and pour the water inside back into the pot as you remove each jar. Place on a clean towel and fill immediately.
One important note: do not dry the inside of sterilized jars with a towel. Even a clean cloth introduces new potential contaminants. Let them drain briefly and fill while still hot and slightly damp.
The Dishwasher Method: Convenient but With Conditions
A dishwasher with a "sanitize" cycle that reaches at least 150°F (65°C) can effectively sanitize glass canning jars, but only under specific conditions. This method is most convenient when you're preparing a large number of jars at once.
When the Dishwasher Method Works
- Your dishwasher has a documented "sanitize" or "high-temp wash" setting that reaches 150°F or above
- You fill the jars immediately after the cycle ends while they are still hot
- You're canning a high-acid product that will be processed for 10 minutes or more in a boiling water bath
When the Dishwasher Method Is Not Enough
- Your dishwasher does not have a sanitize setting or its temperature is not verifiable
- You're canning low-acid foods without a pressure canner (this is unsafe regardless of jar sterilization)
- Jars sit and cool before filling — recontamination is possible once the jar returns to room temperature
The dishwasher method is popular among experienced canners who process large batches of jams or pickles. It works well when timed correctly — run the cycle so that it finishes just as your canning recipe is ready to be ladled into the glass storage jars.
The Oven Method: Use With Caution
The oven method involves placing washed jars in a cold oven, then heating to 225°F (107°C) for 20 minutes. It is sometimes recommended for dry-pack canning (storing dry goods like flour, rice, or beans in sealed glass jars without a water bath).
For traditional wet-pack canning, the oven method is not recommended by the USDA. The primary reasons are:
- Dry oven heat does not penetrate glass as effectively as moist boiling water
- Filling a hot oven-dried jar with hot liquid can still cause thermal cracking if there are any temperature inconsistencies
- Oven temperatures are less consistent and harder to verify than boiling water temperature (which is always 212°F at sea level)
If you do use the oven method for dry goods, never place lids in the oven — the sealing compound in canning lids degrades at high temperatures. Warm lids separately in hot (not boiling) water for a few minutes before use.
Comparison of Sanitization Methods
Each method has its strengths and limitations. The table below summarizes the key differences to help you choose the right approach for your canning project.
| Method | Temperature Reached | USDA Approved | Best For | Main Risk |
|---|---|---|---|---|
| Boiling Water | 212°F (100°C) | Yes | All high-acid wet-pack canning | Burns from steam/hot water |
| Dishwasher (sanitize setting) | 150°F+ (65°C+) | Conditionally | Large batches, high-acid foods | Jars cooling before use |
| Oven (225°F) | 225°F (107°C) dry heat | Not for wet-pack | Dry goods storage only | Uneven heating, glass cracking |
| Pressure Canner | 240°F (116°C) | Yes (required for low-acid foods) | Vegetables, meats, low-acid foods | Improper pressure gauge calibration |
How to Prepare Canning Lids Correctly
Lids are just as important as the glass storage jars themselves, and they require different preparation than the jars. The flat metal lids used in two-piece canning lid systems have a rubber or plastisol sealing compound around the underside rim. This compound is what creates the vacuum seal when the jar cools after processing.
Current guidance from Ball (one of the most widely trusted canning lid manufacturers) updated in recent years states that lids no longer need to be simmered in hot water before use — washing in hot soapy water is sufficient. However, many experienced canners still warm lids in hot (not boiling) water for 5 to 10 minutes as a habit, and there's no harm in doing so as long as the water does not boil, which can damage the sealing compound.
Never boil canning lids. Boiling softens and degrades the sealing compound, which reduces the reliability of the seal. Keep lids warm (around 180°F / 82°C) until the moment you place them on filled jars.
Screw bands should be tightened to "fingertip tight" — firm but not cranked down as hard as possible. Over-tightening prevents air from escaping during processing, which is necessary for a proper vacuum seal to form as the jar cools.
Altitude Adjustments for Jar Sterilization
Water boils at lower temperatures at higher altitudes because of reduced atmospheric pressure. At sea level, water boils at 212°F (100°C), which is sufficient to sterilize glass canning jars in 10 minutes. As elevation increases, the boiling point drops, which means sterilization takes longer to achieve the same result.
| Altitude | Approximate Boiling Point | Sterilization Time |
|---|---|---|
| 0 – 1,000 ft | 212°F (100°C) | 10 minutes |
| 1,001 – 2,000 ft | ~210°F (99°C) | 11 minutes |
| 2,001 – 3,000 ft | ~208°F (98°C) | 12 minutes |
| 3,001 – 4,000 ft | ~206°F (97°C) | 13 minutes |
| 4,001 – 6,000 ft | ~204°F (96°C) | 14 minutes |
| Above 6,000 ft | Below 203°F (95°C) | 15+ minutes |
If you live in Denver (5,280 ft), Salt Lake City (4,226 ft), or other high-elevation locations, this adjustment is not optional — it's a food safety requirement. The same altitude rules apply to your actual canning processing times as well.
Choosing the Right Glass Storage Jar for Canning
Not every glass jar is suitable for canning, and using the wrong type can lead to seal failure, breakage, and safety hazards. Understanding what distinguishes a proper canning glass storage jar from an ordinary jar is fundamental before you start sterilizing anything.
Standard Mason Jar Sizes and Uses
- 4 oz (half cup) jelly jars: Ideal for jams, jellies, condiments, and small-batch preserves
- 8 oz (half pint) jars: Most popular size for jams, preserves, and salsa
- 16 oz (pint) jars: Best for pickles, tomatoes, and fruits
- 32 oz (quart) jars: Standard for vegetables, fruits, and tomato products
- 64 oz (half gallon) jars: Limited use — approved only for apple juice by USDA
Wide-Mouth vs Regular-Mouth Jars
Wide-mouth glass canning jars have a wider opening (approximately 3 inches in diameter) compared to regular-mouth jars (approximately 2.375 inches). Wide-mouth jars are easier to fill with chunky foods like whole tomatoes, pickles, and peach halves. Regular-mouth jars are slightly less expensive and work well for liquids, sauces, and finely chopped foods.
Both types sanitize equally well — the sterilization method does not depend on mouth size. However, wide-mouth jars are generally easier to clean with a bottle brush, which matters in the initial washing step before sterilization.
Jars to Avoid for Canning
- Commercial mayonnaise or pickle jars (thinner glass, not designed for repeated heating)
- European-style glass storage jars with wire bail and rubber gasket closures (not suitable for boiling water bath or pressure canning)
- Decorative or antique mason jars (glass composition and rim integrity cannot be verified)
- Any jar that does not use a standard two-piece lid system
Common Mistakes That Compromise Jar Sterilization
Even experienced canners make sterilization errors that can compromise the safety or shelf life of their preserved foods. These are the most common mistakes and how to avoid them.
Letting Jars Cool Before Filling
Once a sterilized jar cools to room temperature, airborne contaminants can settle onto the rim and interior surfaces. Always fill jars while they are still hot. If a jar has cooled, re-sterilize it before use. This is one of the most common causes of mold in home-canned jams within the first few weeks of storage.
Using Chips or Cracked Jars
A chipped rim on a glass canning jar will not form a proper vacuum seal. Even a tiny chip you can barely see is enough to allow air infiltration over time. Run your finger along the rim of every jar before sterilizing — it's much better to discover damage now than after you've filled and processed the jar. Any jar with rim damage should be retired from canning duty and repurposed for dry storage or another non-canning use.
Skipping the Initial Wash
Sterilization is not a substitute for cleaning. Boiling a dirty jar does not remove food residue — it essentially bakes it on. Always hand wash jars thoroughly before sterilizing, even if they look clean from previous use or are brand new from the store. New jars can carry manufacturing residues, dust, and packaging debris.
Touching the Interior of Sterilized Jars
Once jars are sterilized, avoid putting your fingers, utensils, or cloths inside the jar. Human hands carry significant bacterial loads. Use a sterilized ladle or canning funnel to fill jars, and wipe the rim with a clean cloth dampened with distilled vinegar (not plain water) before applying the lid.
Placing Hot Jars on Cold Surfaces
Thermal shock is one of the most common causes of jar breakage. Never place a hot glass storage jar directly onto a cold counter, stone surface, or metal sink. Always place a folded kitchen towel or a wooden cutting board between the hot jar and any cold surface. The same principle applies in reverse — never pour boiling liquid into a cold jar.
Sanitizing Jars for Specific Types of Canning
The sterilization approach that works best varies depending on what you're canning. Here's a breakdown of the most common canning categories and their specific requirements.
Jams, Jellies, and Preserves (High-Acid)
High-sugar, high-acid products like strawberry jam, orange marmalade, and grape jelly processed for fewer than 10 minutes require fully pre-sterilized glass canning jars. The boiling water method for 10 minutes (adjusted for altitude) is standard. Many jam recipes process for 5 minutes or less, so this pre-sterilization step is mandatory, not optional.
Pickles and Fermented Vegetables
Vinegar-based pickles processed for 10 or more minutes in a boiling water bath sterilize the jar during processing — but you still need to start with clean, hot jars. For fermented vegetables (like lacto-fermented pickles or sauerkraut) that are not heat-processed, cleanliness is critical because you're relying on beneficial bacteria, and contamination can cause off-flavors or spoilage. Wash thoroughly, but do not sterilize with boiling water — it will kill the beneficial bacteria needed for fermentation.
Tomatoes and Tomato Products
Whole tomatoes, crushed tomatoes, and tomato sauce are borderline-acid foods. The USDA recommends adding bottled lemon juice (2 tablespoons per quart) or citric acid (½ teaspoon per quart) to ensure safe acidity levels. Processing times for tomatoes are typically 35 to 85 minutes depending on the product and jar size — long enough that pre-sterilization of jars isn't technically required, but starting with hot, clean jars remains essential to prevent cracking.
Low-Acid Vegetables and Meats (Pressure Canning)
Green beans, corn, carrots, beets, chicken, beef, and fish must be processed in a pressure canner — no exceptions. The pressure canner reaches 240°F (116°C), which is the only temperature high enough to destroy Clostridium botulinum spores. A boiling water bath simply cannot achieve this temperature. For pressure canning, jars must be clean and hot before filling, but the extended processing time at high temperature sterilizes the interior of the jar during canning.
How to Know If Your Jars Sealed Properly After Canning
Even with perfect sterilization, seal failure can occur. Checking for a proper seal after canning is the final quality control step before storing your jars.
After removing jars from the canner, let them sit undisturbed on a towel for 12 to 24 hours. Do not press the centers of lids during this time — this can interfere with the sealing process. After 24 hours, use these three checks:
- Press test: Press the center of the lid. A sealed lid will not flex up and down. If it clicks when pressed, the jar did not seal.
- Sound test: Tap the center of the lid with a spoon. A clear, high-pitched ring indicates a good seal. A dull thud suggests the jar is not sealed.
- Visual test: The lid should be slightly concave (curved down in the center) as a result of the vacuum inside the jar. A flat or convex lid is a sign of seal failure.
Any jar that fails the seal check should be refrigerated and used within 1 to 2 weeks, or reprocessed within 24 hours using a new lid. Never store unsealed canned goods at room temperature — this is how spoilage and foodborne illness happen.
Once confirmed sealed, remove the screw bands for storage. Leaving bands on can lead to rust that makes them difficult to remove later, and a band can sometimes create the illusion of a seal when the lid has actually come loose. Store jars without bands in a cool (50 to 70°F), dark, dry location. Avoid garages or basements with wide temperature fluctuations, which can degrade seal integrity over time.
Reusing Glass Storage Jars: What's Safe and What Isn't
Proper canning-grade glass storage jars are designed to be reused season after season, which makes them a genuinely economical choice over time. However, reuse comes with conditions.
The glass jar body itself can be reused indefinitely as long as it passes visual and tactile inspection — no cracks, chips on the rim, deep interior scratches, or cloudiness that suggests mineral etching from repeated dishwasher use. Glass that has become noticeably cloudy from mineral deposits is weakened and more prone to breaking under thermal stress.
Flat lids (the part with the sealing compound) should never be reused for canning. The compound compresses during the first sealing process and will not create a reliable vacuum seal a second time. At roughly $0.30 to $0.50 per lid, this is not a cost worth cutting.
Screw bands can be reused as long as they show no rust spots, dents on the threading, or warping. A band that no longer sits flat or screws on smoothly should be discarded — it can prevent proper lid placement and interfere with the sealing process during processing.
Between canning seasons, store clean, dry glass canning jars with the bands loosely attached (not tightened) to allow air circulation and prevent musty odors. Keep them in a cabinet away from direct sunlight, which can weaken glass over decades of exposure.
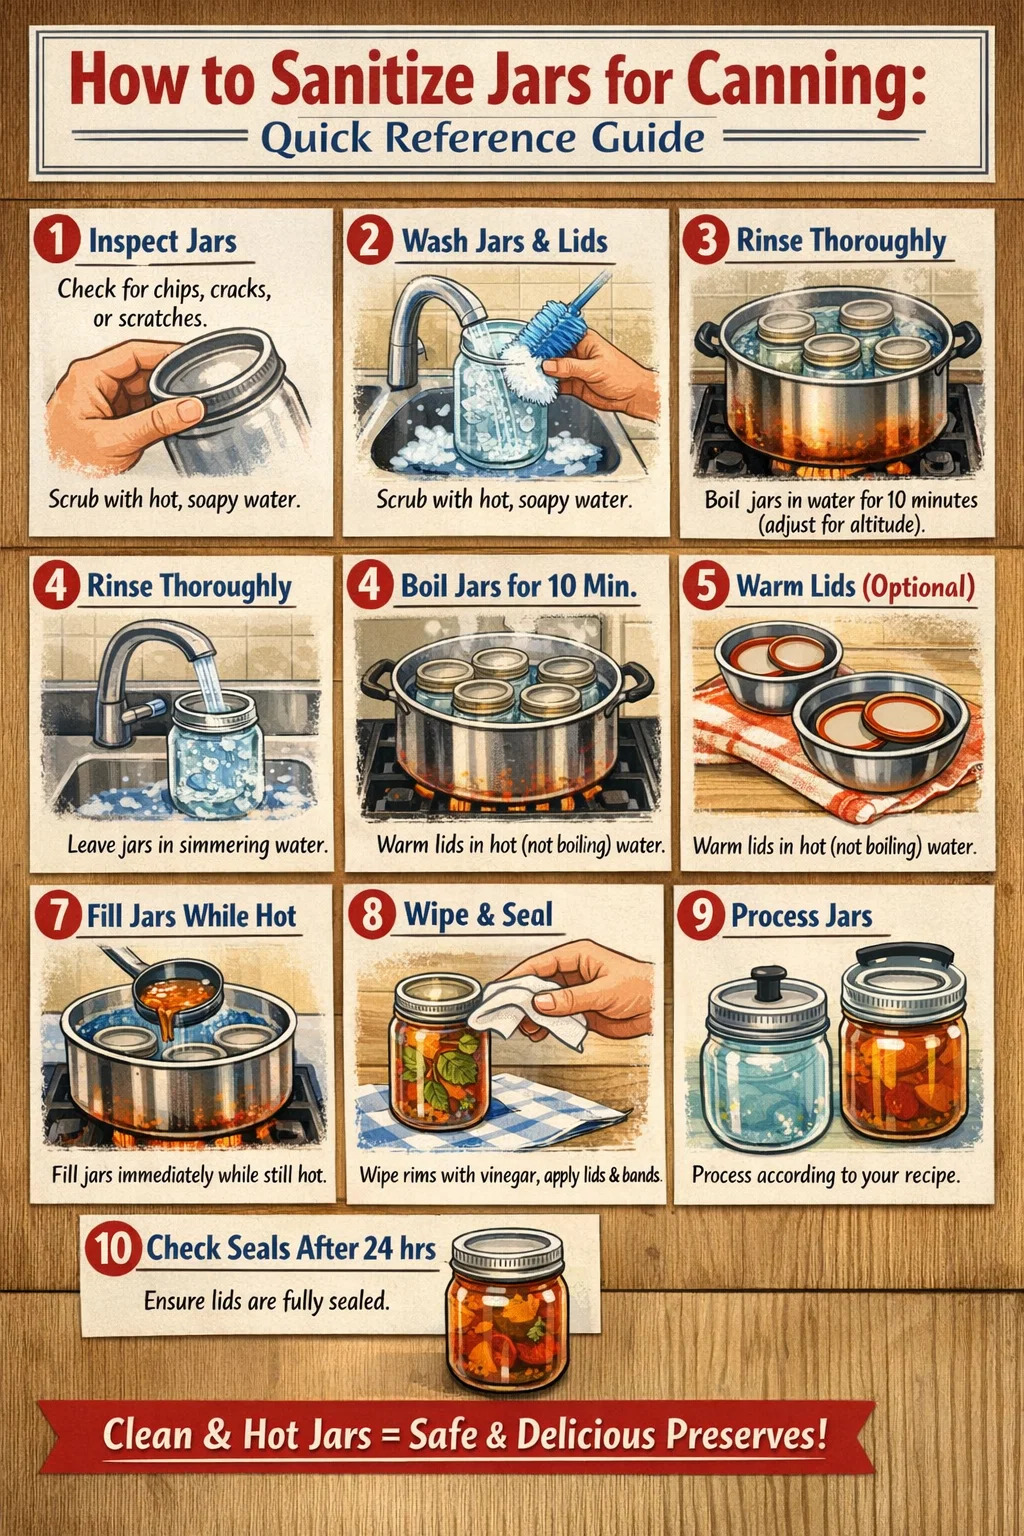
Quick Reference: Sanitization Steps at a Glance
For those who want a fast reference without going back through the full guide, here's a condensed checklist covering every major step in the jar sanitization process.
- Inspect each glass storage jar for chips, cracks, or interior scratches — discard damaged jars
- Wash jars, lids, and bands in hot soapy water using a bottle brush
- Rinse all soap residue completely
- Place clean jars upright on a rack in a pot of water; bring to a full rolling boil
- Boil for 10 minutes minimum (add 1 minute per 1,000 ft above sea level)
- Keep jars hot in simmering water until ready to fill
- Warm lids in hot (not boiling) water if desired; do not boil
- Fill jars immediately after removing from hot water — do not let them cool
- Wipe rims with a cloth dampened with distilled vinegar before placing lids
- Apply bands to fingertip tight — not over-tightened
- Process jars according to your specific recipe and altitude
- Check seals after 24 hours before storing
Following this process consistently every time you can — whether you're putting up a few pints of strawberry preserves or a dozen quarts of diced tomatoes — gives you home-preserved food you can trust to be safe, delicious, and shelf-stable for the year ahead.
Recommended Products
")
")


- PRODUCT
- Glass Storage Jar
- Glass/Stainless Steel Drinking ware
- Kitchen Seasoning Containers
- Home Decoration
- QUICK LINKS
- Products
- About Us
- Manufacture
- ODM/OEM
- News
- Contact Us
- CONTACT US
-
-
 7 Crystal Boulevard xi’an Feng Town, Baoying County,Jiangsu, China.
 -
 WhatsApp: +86-18083783456
 -
 +86-18083766162
+86-18083783456
+86-15895746638
+86-0514-8866-8898
-
 julia@nchousewares.com
Jack@nchousewares.com
-
- CONTACT

