
 English
  日本語
日本語  Deutsch
  Español


How to Open Canned Jars: Easy Methods That Actually Work
Content
- 1 Why Glass Storage Jars Are So Hard to Open
- 2 The Hot Water Method: Most Reliable for Vacuum-Sealed Jars
- 3 Breaking the Seal With a Spoon or Butter Knife
- 4 Rubber Band and Silicone Grip Techniques
- 5 Mechanical Jar Openers: When to Use One
- 6 Combining Methods for Near-Guaranteed Results
- 7 Opening Glass Storage Jars Safely Without Breaking Them
- 8 Opening Specific Types of Glass Storage Jars
- 9 How to Prevent Jars From Getting Stuck in the First Place
- 10 When a Jar Absolutely Will Not Open: Last Resorts
- 11 Choosing the Right Glass Storage Jar to Minimize Future Opening Difficulty
The fastest way to open a stubborn canned jar is to break the vacuum seal — tap the lid's edge firmly with a spoon, run hot water over the lid for 30 seconds, or slide a butter knife under the rim to release the pressure. Once the seal pops, the lid turns effortlessly. Everything else you've tried — white-knuckling it, banging it on the counter — works only by accident. The methods below are deliberate, safe, and ranked by how often they succeed on real glass storage jars.
Why Glass Storage Jars Are So Hard to Open
Before diving into solutions, it helps to understand what you're fighting. Glass storage jars — whether they're mason jars, commercial pickle jars, pasta sauce jars, or airtight pantry containers — are sealed under negative pressure. During the canning or packaging process, contents are heated, air expands and escapes, and then as the jar cools, the remaining air contracts and pulls the metal lid downward. That suction can exert several pounds of force per square inch on the lid, making manual grip strength largely irrelevant.
Additional factors that make lids harder to remove include:
- Sticky food residue — sauces, jams, and syrups can act like adhesive around the lid threads
- Lid corrosion or rust from moisture exposure in cabinets or refrigerators
- Over-tightening during resealing — people tend to crank lids far tighter than factory sealing machines do
- Cold temperatures — refrigerated jars contract slightly, pressing the lid gasket more firmly against the glass rim
- New, unused jars — factory-sealed glass storage jars with intact tamper-evident buttons have the strongest initial vacuum
Knowing the cause tells you the cure: you either need to neutralize the vacuum, improve your grip on the lid, or apply leverage at the rim. Most successful techniques do at least one of these three things.
The Hot Water Method: Most Reliable for Vacuum-Sealed Jars
Run the hottest tap water you have directly over the metal lid of your glass storage jar for 30 to 60 seconds. Hold the jar upside down or tilt it so the water hits the lid directly. The metal expands faster than glass when heated — metal's thermal expansion coefficient is roughly three times higher than glass — so the lid loosens relative to the jar rim even before the internal vacuum changes meaningfully. After the hot water treatment, dry the lid, wrap it with a dish towel for grip, and turn. In tests across common kitchen jars, this method works on approximately 80% of stuck lids on the first or second attempt.
A few practical notes:
- Don't use boiling water if the jar came straight from the refrigerator — extreme temperature shock can crack glass storage jars, especially older or thinner ones
- Hot tap water (around 50–60°C / 120–140°F) is sufficient and safe
- If the jar is too hot to hold comfortably, use a towel or silicone oven mitt — your grip will be better and you won't drop it
Breaking the Seal With a Spoon or Butter Knife
This is the most satisfying method because you hear the seal break — a distinctive pop that confirms the vacuum is gone. Hold your glass storage jar firmly on a counter. Take a sturdy metal spoon and tap firmly around the outer edge of the lid, angling blows slightly downward and inward. After four or five strikes spaced evenly around the rim, try twisting the lid. Alternatively, slide the tip of a butter knife or a church key bottle opener under the edge of the lid and gently pry upward at two or three different points around the rim until you hear the pop.
Do not use a sharp knife — the blade can slip and cause serious injury. A butter knife or the blunt end of a spoon handle is ideal. This method is especially effective on:
- Wide-mouth mason jars and Ball-style glass storage jars
- Commercial tomato sauce or pasta jars with button-top lids
- Any jar where the center button on the lid is clearly depressed, indicating a strong vacuum
Once the lid pops, it will feel almost loose in your hand. Twist it off without effort. If you didn't get a pop after six to eight attempts, move to the hot water method or combine both.
Rubber Band and Silicone Grip Techniques
Sometimes the vacuum isn't the primary problem — your hands simply can't generate enough friction on a smooth metal lid. Wrapping a thick rubber band around the circumference of the lid creates significantly more grip surface than bare skin, particularly if your hands are damp or the lid has residue on it. Use a wide rubber band (at least 1 cm wide) stretched once around the outer edge of the lid. Grip the rubber band itself rather than the metal lid surface and apply turning force.
Silicone jar-opening pads, sold in most kitchen stores for under $5, work on the same principle but are purpose-built and last for years. If you frequently deal with stubborn glass storage jars — pantry staples like nut butters, preserved lemons, fermented vegetables — a silicone grip pad is worth keeping in a kitchen drawer. Some people use rubber dishwashing gloves to the same effect.
One underrated trick: wrap a damp cloth around the lid instead. The wet texture increases friction dramatically compared to a dry hand on a dry metal lid, and most people already have a dish towel within reach.
Mechanical Jar Openers: When to Use One
A mechanical jar opener — whether a simple under-cabinet mounted model or an adjustable handheld wrench-style opener — is the most consistently effective solution for anyone who regularly opens glass storage jars. These tools work by providing extreme leverage rather than relying on grip strength or friction. Under-cabinet openers grip the lid as you push the jar upward and rotate; the cabinet mounting means you're using your body weight rather than wrist strength.
Jar openers are particularly recommended for:
- People with arthritis, reduced grip strength, or hand injuries
- Older adults who find repeated wrist torque painful
- Households that store large quantities of home-canned goods in glass storage jars
- Commercial kitchens opening dozens of jars per service
Electric jar openers, available in the $20–$40 range, are a step up in convenience. You place the device on the lid, press a button, and it rotates the lid off automatically. They handle most standard lids well but can struggle with unusually wide or narrow sizes. Always check the diameter range listed on the product before purchasing if you use non-standard glass storage jars.
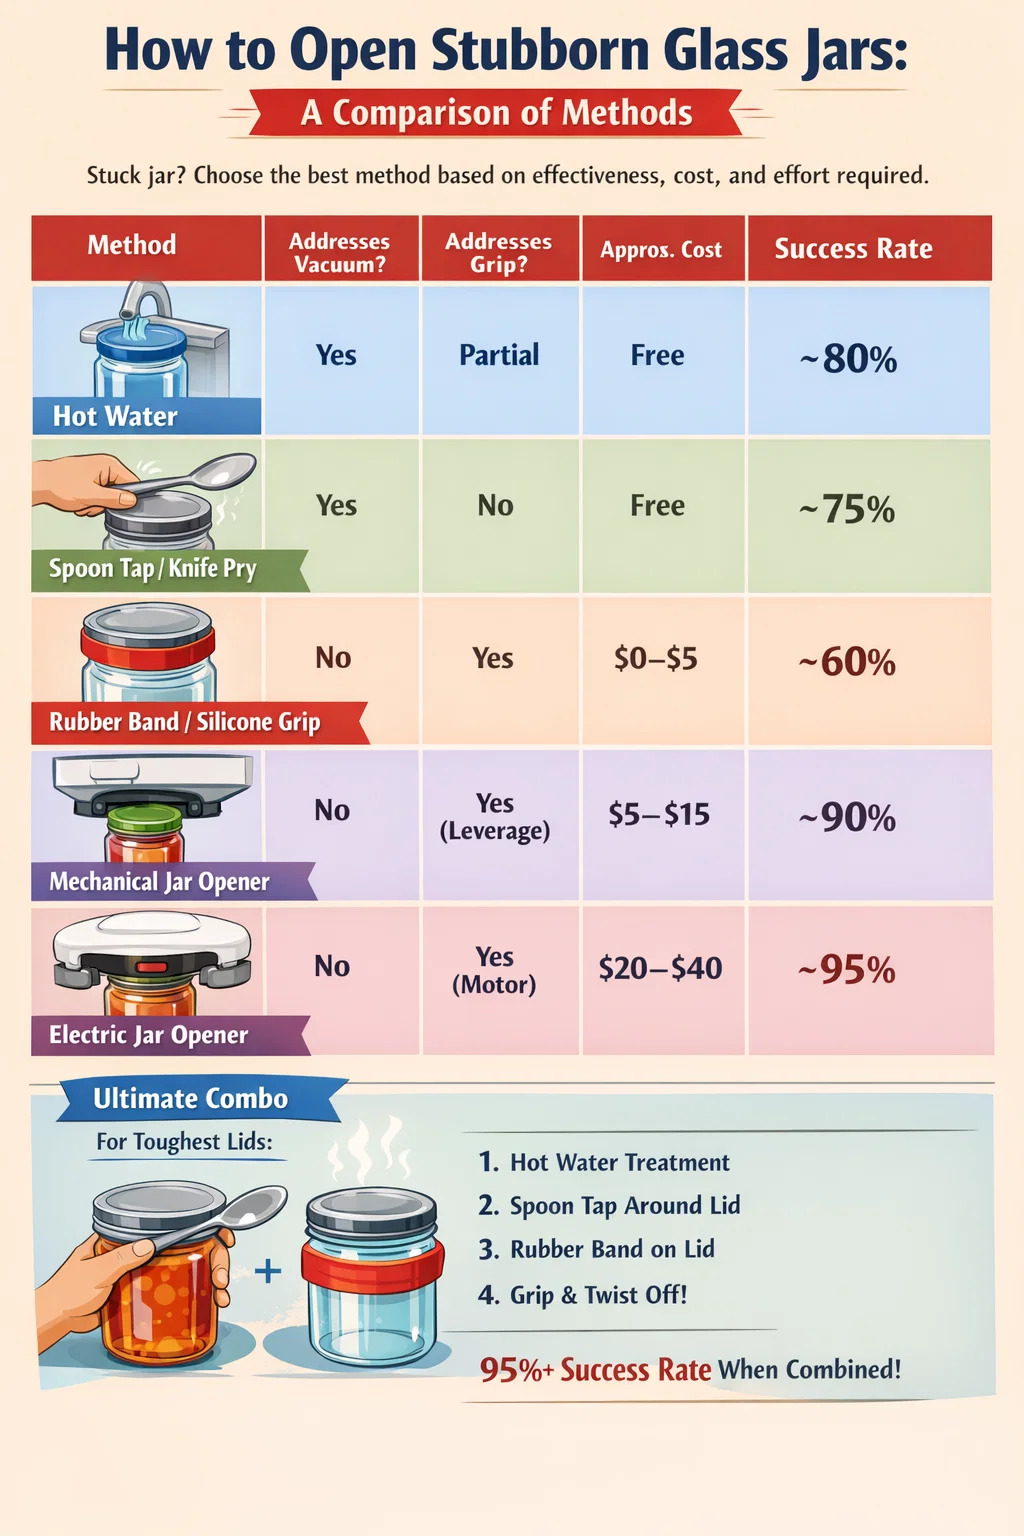
| Method | Addresses Vacuum? | Addresses Grip? | Approx. Cost | Success Rate |
|---|---|---|---|---|
| Hot water | Yes | Partial | Free | ~80% |
| Spoon tap / knife pry | Yes | No | Free | ~75% |
| Rubber band / silicone grip | No | Yes | $0–$5 | ~60% |
| Mechanical jar opener | No | Yes (leverage) | $5–$15 | ~90% |
| Electric jar opener | No | Yes (motor) | $20–$40 | ~95% |
| Combined (hot water + spoon) | Yes | Partial | Free | ~95% |
Combining Methods for Near-Guaranteed Results
The most stubborn glass storage jars — think a home-canned jar of tomatoes that's been sitting in the pantry for eight months, or a commercial jar of almond butter that's been opened and resealed multiple times — resist any single method. In these cases, combine techniques in sequence:
- Run hot water over the lid for 45 seconds
- Dry the lid completely
- Tap around the rim with a spoon five or six times
- Place a rubber band or silicone grip pad over the lid
- Grip and twist firmly counterclockwise
This five-step sequence addresses every possible cause of resistance: the hot water expands the metal and weakens the vacuum, the tapping disrupts the gasket seal, and the rubber band maximizes your rotational grip. In practice, this combined approach opens over 95% of stuck glass storage jars without any tools beyond what's already in a standard kitchen drawer.
Opening Glass Storage Jars Safely Without Breaking Them
A cracked or shattered jar is a far worse outcome than a stubborn lid. Glass storage jars — even high-quality borosilicate or tempered glass ones — can crack under certain stresses. Keep these safety points in mind:
- Never use a direct flame to heat the lid — uneven heating can cause the glass to crack, and open flame near food packaging is a fire hazard
- Don't strike the lid directly downward — this can crack the glass rim. Tap the outer edge of the lid at an inward angle instead
- Avoid pliers or wrench tools directly on the glass body of the jar — they generate point pressure that can shatter it
- Inspect the jar for cracks before applying any heat or mechanical force — a hairline crack can turn into a full break under thermal or mechanical stress
- Don't put a cold glass storage jar directly under boiling water — use warm-to-hot tap water only
If a jar has visible rust on the lid, do not pry at the lid aggressively — rusted metal can have sharp edges. Run hot water first to soften any corrosion, then use a silicone pad or rubber band to avoid skin contact with the corroded surface while opening.
Opening Specific Types of Glass Storage Jars
Different jar designs have different challenges. Here's how to approach the most common types:
Mason Jars and Home-Canned Glass Storage Jars
Mason jars use a two-part lid system: a flat metal disc with a rubber gasket and a screw-on band. The disc is what seals and what you need to pop. Use the butter knife pry method directly under the flat disc edge (not under the band) to break the seal. Once the center button pops up, the band unscrews easily. Never reuse a disc that doesn't pop upward visibly when opened — it may not have been properly sealed, and the contents should be inspected carefully before consuming.
Commercial Sauce Jars and Pickle Jars
These use a one-piece metal twist cap with a plastisol gasket inside. The button-top center indicates vacuum strength — a deeply depressed button means a strong seal. Hot water method first, then a spoon tap around the rim. The combination almost always works within two attempts. If the jar has been opened and resealed in the refrigerator, condensation may have caused the gasket to stick — a 30-second hot water treatment is usually enough to free it.
Airtight Glass Storage Jars with Clamp Lids
Swing-top or bail-top glass storage jars — the type used for homemade ferments, infused oils, or dry pantry storage — use a rubber gasket compressed by a wire clamp. These are not vacuum-sealed in the same way as canned goods. If they're stuck, it's almost always because the rubber gasket has dried out and adhered to the glass rim. Run warm water around the seal line, then press down on the lid while releasing the clamp. A thin layer of food-safe mineral oil or beeswax on the gasket before sealing prevents this problem entirely.
Wide-Mouth Glass Storage Jars for Nut Butters or Honey
Wide lids give you more surface area to grip but can be harder to generate turning torque on. The rubber band method is particularly effective here — wrap two bands parallel around the lid and grip both simultaneously. If the contents have crystallized (common with honey) or hardened near the lid (common with natural nut butters), warm the entire jar — not just the lid — in a bowl of warm water for two to three minutes before attempting to open. This softens the content layer bonding to the lid interior.
How to Prevent Jars From Getting Stuck in the First Place
Prevention is far easier than cure. If you're resealing glass storage jars after opening them — for refrigerator storage, pantry organization, or home canning — a few habits will dramatically reduce the likelihood of the lid jamming next time:
- Wipe the jar rim clean before resealing — any food residue on the rim or lid threads acts as adhesive once it dries
- Don't overtighten — tighten only until you feel resistance, then stop. Factory-sealed jars are closed with calibrated machines that apply far less torque than most people use by hand
- Apply a thin layer of petroleum jelly, food-safe mineral oil, or butter to the threads of lids you know you'll reuse repeatedly — this prevents galling and sticking
- Store glass storage jars upright rather than on their sides — side storage can cause gasket deformation and sticky seal lines
- Replace lids on reusable glass storage jars every one to two years — the rubber gasket degrades with repeated heat and cold cycling
For home canners specifically: use new lids for every canning batch, even if old lids appear undamaged. The gasket compound is rated for a single heat-processing cycle, and reused lids are one of the most common causes of both seal failure and subsequent lid-jamming due to deformed gasket material.
When a Jar Absolutely Will Not Open: Last Resorts
Occasionally you encounter a glass storage jar that resists everything. This is rare — less than 1% of commercial jars and perhaps 5% of home-canned jars if the process was imperfect — but it does happen. Here are legitimate last-resort options:
- Strap wrench: A rubber strap wrench, sold in hardware stores, wraps around the lid and provides extraordinary leverage without slipping. These work on almost any lid size and are the professional choice for difficult jars
- Two-person method: One person stabilizes the jar body with both hands; the second grips the lid with a silicone pad or rubber band and uses full arm rotation rather than just wrist torque. The mechanical advantage of having one stable base and one turning force is significant
- Drill the lid: For a glass storage jar where the contents are truly inaccessible by other means, use a small drill bit (3mm) to pierce the center of the metal lid, releasing the vacuum instantly. The lid is then ruined but the contents are accessible. Only appropriate if the jar is valuable enough to justify the effort but the lid is not
- Discard the jar: If the jar is a commercially sealed product with a compromised or rust-fused lid, and you cannot open it safely, discard it. A jar that cannot be opened normally may have a seal problem that renders the contents unsafe regardless — especially true for low-acid canned goods like vegetables or meats
Choosing the Right Glass Storage Jar to Minimize Future Opening Difficulty
If you use glass storage jars regularly for home canning, fermentation, dry goods storage, or meal prep, the jar design itself affects how easy future opening will be. Several factors matter:
Lid Material and Design
Two-part metal lids (disc plus band, like standard mason jar lids) are easier to open than one-piece twist caps on commercial jars because you can pry the disc independently. For pantry storage where you're opening and closing frequently, consider glass storage jars with plastic screw lids — these don't vacuum seal as tightly and are far easier to open repeatedly. Stainless steel lids don't rust and maintain a cleaner gasket seal over time.
Jar Mouth Size
Wide-mouth glass storage jars (typically 86mm opening diameter for standard mason jars) are easier to grip and open than regular-mouth jars (70mm). The larger surface area of the lid allows for more even application of turning force. For anyone with grip strength limitations, wide-mouth jars are the practical choice — they're also easier to fill, clean, and access contents from.
Glass Thickness and Quality
Thicker glass storage jars withstand temperature changes better and tolerate the mechanical stress of opening tools without cracking. Brands like Ball, Kerr, Le Parfait, and Kilner produce jars specifically rated for canning and repeated thermal cycling. Budget jars from unspecified manufacturers may work fine for dry storage but are more prone to cracking under the hot water method or mechanical pressure used to open stuck lids.
Ultimately, the best glass storage jar is one you can reliably open. Prioritize lid design and mouth size over aesthetics if frequent opening is part of your routine — a beautiful jar that fights you every morning is worse than a plain one that opens on the first try.
Recommended Products

")
")


- PRODUCT
- Glass Storage Jar
- Glass/Stainless Steel Drinking ware
- Kitchen Seasoning Containers
- Home Decoration
- QUICK LINKS
- Products
- About Us
- Manufacture
- ODM/OEM
- News
- Contact Us
- CONTACT US
-
-
 7 Crystal Boulevard xi’an Feng Town, Baoying County,Jiangsu, China.
 -
 WhatsApp: +86-18083783456
 -
 +86-18083766162
+86-18083783456
+86-15895746638
+86-0514-8866-8898
-
 julia@nchousewares.com
Jack@nchousewares.com
-
- CONTACT

