
 English
  日本語
日本語  Deutsch
  Español


How to Keep Cut Apples from Turning Brown (Proven Methods)
Content
- 1 The Short Answer: Acid, Salt, or Airtight Storage Stop Browning Fast
- 2 Why Apples Brown in the First Place
- 3 Lemon Juice Method: The Most Reliable Kitchen Solution
- 4 Saltwater Soak: Surprisingly Effective and Flavor-Neutral
- 5 Airtight Storage in Glass Containers: The Role of Oxygen Exclusion
- 6 Honey Water: A Natural Option with Added Flavor
- 7 Commercial Produce Preservers: When You Need Maximum Shelf Life
- 8 Method Comparison: Which Approach Works Best for Different Situations
- 9 Keeping Whole Apples Fresh Longer Before Cutting
- 10 Cutting Technique Affects Browning Rate
- 11 Reassembling the Apple: A No-Treatment Trick That Actually Works
- 12 Using Glass Kitchen Seasoning Containers for Individual Apple Portions
- 13 What Doesn't Work (Common Myths Worth Clearing Up)
- 14 Practical Routine: Best Practice for Everyday Apple Prep
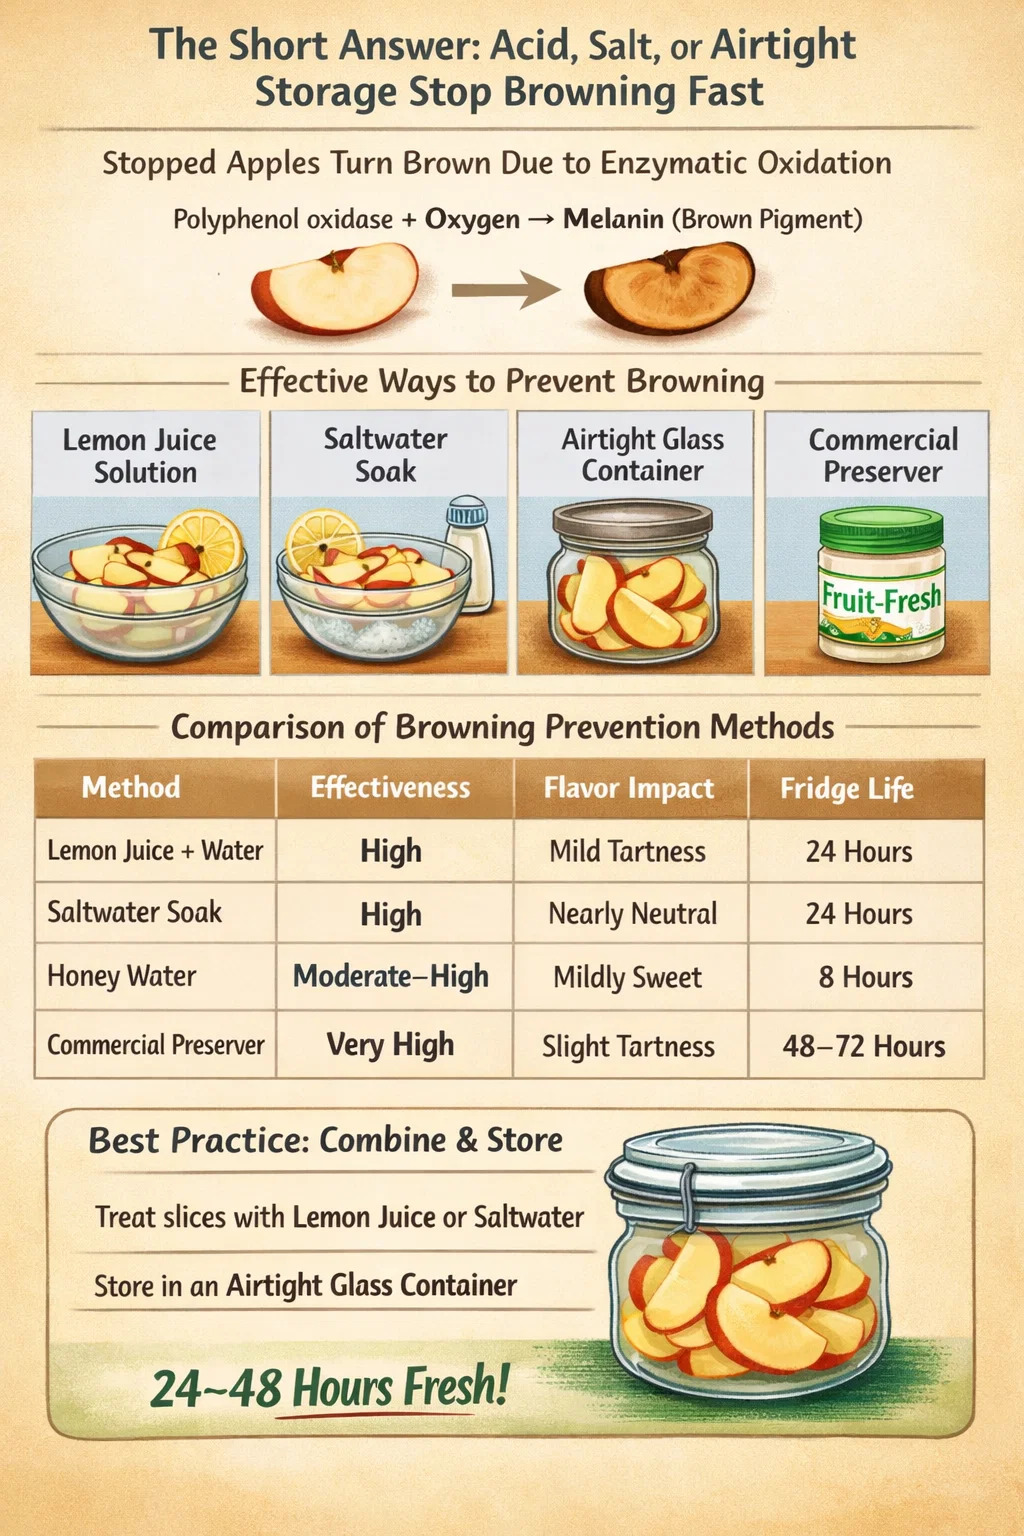
The Short Answer: Acid, Salt, or Airtight Storage Stop Browning Fast
Cut apples turn brown because of a chemical process called enzymatic oxidation. When the flesh is exposed to air, an enzyme called polyphenol oxidase reacts with oxygen and phenolic compounds in the apple, producing melanin — the brown pigment you see within minutes of slicing. The fix is straightforward: disrupt the enzyme, block the oxygen, lower the pH, or some combination of all three.
The most effective methods include soaking apple slices in a diluted lemon juice solution, using a saltwater bath, applying commercial produce preservers like Fruit-Fresh, or storing the slices in an airtight container — ideally a glass container — immediately after cutting. Each approach has different ideal use cases depending on whether you're prepping snacks for kids, building a charcuterie board, or meal-prepping for the week.
Why Apples Brown in the First Place
Understanding the browning process makes it much easier to choose the right prevention method. The enzyme polyphenol oxidase (PPO) is present in apple cells but stays separated from its substrates under normal conditions. Once you cut into the apple, those cells are damaged, and PPO comes into direct contact with oxygen and the phenols naturally found in apple tissue.
The reaction starts almost immediately — visible browning can appear in as little as 3 to 5 minutes on a freshly cut apple at room temperature. Warmer temperatures accelerate the process; refrigeration slows it down but doesn't stop it.
Different apple varieties also brown at different rates. Granny Smith apples, which are high in malic acid, brown more slowly than sweeter varieties like Fuji or Gala. Red Delicious apples tend to brown especially quickly due to their phenolic compound content. Knowing your apple variety matters when deciding how urgently you need to apply a preservation method.
Lemon Juice Method: The Most Reliable Kitchen Solution
Lemon juice works on two levels: the citric acid lowers the pH of the apple surface, which inhibits PPO activity, and the ascorbic acid (vitamin C) in lemon juice acts as an antioxidant that consumes available oxygen before it can react with the apple's phenols.
How to Do It Correctly
Don't just squeeze lemon juice directly over your apple slices — that often leads to uneven coverage and a strong lemon flavor. Instead, mix 1 tablespoon of fresh lemon juice with 1 cup of cold water, then soak your apple slices for 3 to 5 minutes. Remove them, shake off the excess, and store as needed.
This dilution ratio keeps the tart lemon taste subtle enough that most people — including children — won't notice it. If you're preparing a savory dish or a cheese board, this is usually the preferred method because it doesn't add any sweetness.
Properly treated apple slices kept in an airtight container in the refrigerator will stay fresh-looking for up to 24 hours, sometimes longer. Some sources report up to 8 hours at room temperature for treated slices left out on a platter, which is practical for parties and events.
Bottled vs. Fresh Lemon Juice
Fresh lemon juice is more effective because it contains higher and more active ascorbic acid levels. Bottled lemon juice works too but may be slightly less potent depending on how long it's been open. Either will prevent browning for practical everyday purposes. Orange juice, lime juice, and even pineapple juice work on the same principle, though they each add their own flavor profile to the apples.
Saltwater Soak: Surprisingly Effective and Flavor-Neutral
The saltwater method is less well-known than lemon juice but is often preferred by food scientists and professional kitchens. Salt (sodium chloride) inhibits the PPO enzyme directly, and a dilute solution doesn't make the apples taste salty at all.
The ratio matters here: use 1/4 teaspoon of salt per cup of cold water. Soak the apple slices for 3 to 5 minutes, then rinse them lightly under cold water before serving or storing. The rinsing step is optional — at this concentration, the salt flavor is barely detectable even without rinsing — but it's a good habit if you're serving to guests.
A study published in the journal Food Chemistry found that salt solutions were among the most effective single-ingredient treatments for reducing enzymatic browning in fresh-cut fruit, outperforming plain water and even some acid-based treatments in controlled conditions. For people who want a method that doesn't add any detectable flavor, this is arguably the best everyday option.
Don't use too much salt — concentrations above 1 teaspoon per cup of water begin to affect flavor noticeably and can draw moisture out of the apple slices, making them slightly limp over time.
Airtight Storage in Glass Containers: The Role of Oxygen Exclusion
Even after treating apple slices with lemon juice or salt, the storage container you use makes a significant difference in how long they stay fresh and appealing. Glass Kitchen Seasoning Containers and glass food storage jars with airtight lids are among the best options available for keeping cut apples from browning during refrigeration.
Glass doesn't absorb odors or flavors the way plastic containers can. It also doesn't leach any chemicals into the food, which matters when you're storing acidic foods like lemon-treated apples. The non-porous surface means glass containers create a genuinely neutral storage environment.
Why Glass Outperforms Plastic for Cut Fruit
Plastic containers, especially older or lower-quality ones, often have micro-scratches on the interior surface where bacteria and odors accumulate. Over time, those containers can impart off-flavors to delicate foods like fresh-cut apples. Glass surfaces remain smooth and inert indefinitely.
Glass Kitchen Seasoning Containers with tight-fitting lids work particularly well for individual portions. Their small volume means less air is trapped inside with the apple slices, reducing the oxygen available to drive the browning reaction. Pack the slices snugly — the less air space, the better.
For larger quantities, wide-mouth glass mason jars or glass meal-prep containers with rubber-sealed lids are excellent choices. Apple slices stored in a properly sealed glass container at refrigerator temperature (around 35–38°F / 2–3°C) after a lemon juice treatment can remain visually fresh for 24 to 48 hours.
Tips for Using Glass Containers Effectively
- Layer apple slices flat rather than piling them randomly — this reduces bruising, which accelerates browning at contact points.
- If using a large container with extra air space, press a sheet of plastic wrap directly onto the surface of the apple slices before closing the lid — this creates a secondary barrier against oxygen.
- Don't store cut apples near strong-smelling foods in the refrigerator; glass won't absorb the smell, but the apples themselves are porous and can pick up odors from nearby onions or garlic.
- Glass containers can go straight from refrigerator to table, making them convenient for serving and display.
- Clean glass containers with hot water and a mild detergent after each use — residue from previous foods can introduce bacteria that accelerate fruit spoilage.
Honey Water: A Natural Option with Added Flavor
Honey contains several compounds — including glucose oxidase, catalase, and various flavonoids — that naturally inhibit oxidation. Diluted honey water works as a browning preventative while adding a mild sweetness that complements apple flavor rather than competing with it.
Mix 2 tablespoons of honey with 1 cup of cold water and stir until fully dissolved. Soak apple slices for 30 seconds to 1 minute — a longer soak makes the apples taste noticeably sweet. Remove, shake off excess, and store in a glass container.
Research from the University of Illinois found that a diluted honey solution was effective at reducing browning in fresh-cut apples for up to 8 hours when refrigerated. The method is particularly popular for children's lunchboxes because the mild sweetness is appealing and there's no sourness from acid-based treatments.
This method isn't ideal for savory preparations or if you're watching sugar intake, but for fruit salads, snack plates, and lunchbox prep, it's one of the most practical and tasty-tasting options available.
Commercial Produce Preservers: When You Need Maximum Shelf Life
Products like Fruit-Fresh (Ball) and similar commercial produce preservers are primarily ascorbic acid (vitamin C) blended with citric acid and sometimes dextrose. They're specifically formulated to prevent browning in cut fruit and vegetables and are commonly used in home canning and professional food prep.
Commercial preservers typically keep cut apples fresh-looking for 6 to 8 hours at room temperature and up to 72 hours when refrigerated in an airtight glass container — significantly longer than most home methods. For events, catering, or bulk meal prep, this extended window is worth the small added cost.
Follow the package directions, which usually call for dissolving the powder in water or sprinkling it directly on the cut fruit and tossing to coat. The flavor impact is minimal — a very slight tartness that most people don't notice in a finished dish.
Method Comparison: Which Approach Works Best for Different Situations
Not every situation calls for the same method. Here's a direct comparison of the most common approaches based on effectiveness, flavor impact, and convenience:
| Method | Effectiveness | Flavor Impact | Best For | Fridge Life |
|---|---|---|---|---|
| Lemon juice + water | High | Mild tartness | Cheese boards, salads | 24 hours |
| Saltwater soak | High | Nearly neutral | Savory dishes, snacks | 24 hours |
| Honey water | Moderate–High | Mildly sweet | Kids' snacks, lunchboxes | 8 hours |
| Commercial preserver | Very High | Slight tartness | Events, meal prep, catering | 48–72 hours |
| Airtight glass container only | Moderate | None | Short-term storage (1–2 hrs) | 4–6 hours |
| Treatment + glass container | Very High | Minimal | All-purpose best practice | 24–48 hours |
The takeaway from this comparison is clear: combining any acid or salt treatment with airtight glass storage gives you the best results across every category. Neither method alone is as effective as using both together.
Keeping Whole Apples Fresh Longer Before Cutting
Prevention starts before you even pick up the knife. How you store whole apples directly affects how quickly the flesh browns after cutting. Apples kept in a refrigerator crisper drawer at around 35°F (2°C) with moderate humidity stay firm and high in antioxidants significantly longer than apples left on a countertop at room temperature.
Whole apples can last 4 to 6 weeks in the refrigerator versus just 1 to 2 weeks on the counter. An apple that's been sitting at room temperature for two weeks has lower antioxidant and moisture content, meaning its flesh browns faster after cutting compared to a freshly refrigerated apple.
Store whole apples away from other produce if possible. Apples release ethylene gas as they ripen, which accelerates the ripening and eventual spoilage of nearby fruits and vegetables. If you're storing multiple apples together, place them in a glass or plastic container or a zip-seal bag in the crisper — this limits ethylene exposure to other produce while keeping the apples themselves at optimal humidity.
Cutting Technique Affects Browning Rate
The way you cut an apple matters more than most people realize. A sharp knife creates clean cell cuts with minimal crushing or bruising. A dull knife tears and crushes cells as it moves through the apple flesh, releasing more PPO enzyme, more phenols, and creating more surface area exposed to oxygen — all of which mean faster browning.
Always use the sharpest knife available when cutting apples you plan to store. A mandoline set to a consistent thickness also works well and creates very clean slices. Avoid using serrated knives for apple prep — the teeth create microscopic tears in the flesh that accelerate oxidation.
Thicker slices also brown more slowly than very thin ones simply because there's a smaller ratio of cut surface area to total volume. If you're cutting apples for a fruit platter that needs to look good for several hours, cut them into wedges rather than thin rounds.
Another practical trick: cut your apples as close to serving or storing time as possible. Every minute between cutting and treatment or storage is a minute of browning you can't reverse. Prepare your treatment solution — whether lemon water, saltwater, or honey water — before you start cutting, so the slices can go straight into the soak the moment they're cut.
Reassembling the Apple: A No-Treatment Trick That Actually Works
If you're cutting an apple for a lunchbox or for someone who will eat it within a few hours and you'd prefer not to use any liquid treatment, there's a clever physical trick that works well: cut the apple into slices or wedges, then reassemble them in their original shape and hold them together with a rubber band or a small strip of food-safe silicone wrap.
By pressing the cut surfaces back together tightly, you dramatically reduce oxygen exposure to the flesh. Reassembled apples held together firmly can resist browning for 2 to 4 hours without any treatment at all. This approach is particularly popular for school lunches because it requires no extra ingredients and presents a whole-looking apple that unfolds into pre-cut slices.
For even better results, reassemble the apple slices and then place the whole reassembled apple in a snug glass container — the combination of minimal oxygen between slices and an airtight glass environment keeps browning at bay for a significant portion of the school day.
Using Glass Kitchen Seasoning Containers for Individual Apple Portions
Glass Kitchen Seasoning Containers — typically small, wide-mouth glass jars with airtight lids — have found a loyal following as food storage containers well beyond their original purpose. Their compact size (usually 4 to 8 oz) is ideal for individual portions of cut apple slices, making them practical for meal prep, lunchboxes, and office snacks.
The tight-sealing lids on most glass seasoning containers create a genuinely low-oxygen environment inside when the jar is packed full. When you fill a small glass jar to the brim with lemon-treated apple slices, there's minimal air space, which is the ideal storage condition. Compare this to a large container with a handful of apple slices rattling around inside — that extra air space is essentially an oxygen reservoir that continues to drive the browning reaction.
Glass Kitchen Seasoning Containers are also dishwasher-safe, transparent (so you can see contents at a glance without opening), stackable, and free of the chemical concerns associated with some plastic food containers. For someone who meal preps apple slices several times per week, having a set of these containers is a meaningful upgrade over flimsy zip bags or plastic tubs.
They're widely available at kitchen stores, home goods retailers, and online. Look for versions with silicone-sealed lids rather than simple screw-tops — the silicone gasket creates a better oxygen barrier, which is exactly what you need for preserving cut fruit.
What Doesn't Work (Common Myths Worth Clearing Up)
Several apple-browning tips circulate online that sound plausible but don't hold up in practice:
- Plain water soak: Soaking apple slices in plain water reduces browning somewhat by limiting direct oxygen contact, but it doesn't inhibit the PPO enzyme. Slices will still brown within 30 to 60 minutes in plain water, and prolonged soaking makes them waterlogged and tasteless.
- Refrigerating without treatment: Cold temperatures slow browning but don't stop it. Untreated apple slices in a loosely covered container in the refrigerator will be noticeably brown within 2 to 3 hours.
- Rubbing the cut surface with lemon: Applying lemon juice by rubbing it directly onto cut surfaces works but often misses edges and irregular surfaces. Soaking gives much more consistent coverage.
- Plastic wrap on individual slices: Wrapping individual apple slices in plastic is time-consuming and rarely creates a tight enough oxygen barrier to matter. An airtight glass container is more effective and far less wasteful.
- Vinegar soaks: Dilute vinegar does lower pH and can slow browning, but the flavor impact is noticeable and not pleasant for most applications. Stick to lemon juice for acid-based treatment.
Practical Routine: Best Practice for Everyday Apple Prep
For most home cooks, the following routine covers all the bases without adding significant time or effort to the process:
- Prepare your treatment solution first — mix 1 tablespoon of fresh lemon juice or 1/4 teaspoon of salt into 1 cup of cold water in a bowl large enough to hold your apple slices.
- Use the sharpest knife you have. Cut the apple into even slices, wedges, or cubes depending on your needs.
- Transfer the cut apple immediately into the treatment solution. Let it soak for 3 to 5 minutes.
- Remove the slices and gently shake off excess liquid. No need to pat dry — a light coating of the solution is beneficial.
- Pack the slices snugly into a glass container with an airtight lid — Glass Kitchen Seasoning Containers for individual portions, a glass mason jar or glass meal-prep container for larger batches.
- Seal tightly and refrigerate immediately if not serving right away. Aim for refrigerator placement within 10 minutes of cutting.
This process takes less than 10 minutes total and reliably keeps cut apples looking and tasting fresh for 24 hours or more — long enough to cover any practical home use case from lunchbox prep to party platter.
Recommended Products
")
")


- PRODUCT
- Glass Storage Jar
- Glass/Stainless Steel Drinking ware
- Kitchen Seasoning Containers
- Home Decoration
- QUICK LINKS
- Products
- About Us
- Manufacture
- ODM/OEM
- News
- Contact Us
- CONTACT US
-
-
 7 Crystal Boulevard xi’an Feng Town, Baoying County,Jiangsu, China.
 -
 WhatsApp: +86-18083783456
 -
 +86-18083766162
+86-18083783456
+86-15895746638
+86-0514-8866-8898
-
 julia@nchousewares.com
Jack@nchousewares.com
-
- CONTACT

