
 English
  日本語
日本語  Deutsch
  Español


How to Clean an Olive Oil Bottle: Glass Oil Bottle Guide
Content
- 1 The Short Answer: How to Clean an Olive Oil Bottle Effectively
- 2 Why Olive Oil Residue Is Harder to Clean Than Most People Think
- 3 Step-by-Step: Everyday Cleaning for a Glass Oil Bottle
- 4 Deep Cleaning: Removing Stubborn Oil Residue and Rancid Buildup
- 5 Cleaning Methods Compared: Which Works Best for Glass Oil Bottles
- 6 Can You Put a Glass Oil Bottle in the Dishwasher?
- 7 How to Clean Different Types of Glass Oil Bottles
- 8 Removing the Stopper, Pourer, and Cap — and Cleaning Them Separately
- 9 How Often Should You Clean an Olive Oil Bottle?
- 10 Drying and Storing a Glass Oil Bottle After Cleaning
- 11 Tips for Keeping a Glass Oil Bottle Cleaner for Longer
- 12 Frequently Asked Questions
- 12.1 Can I reuse an olive oil glass bottle without cleaning it first?
- 12.2 How do I get rid of the rancid smell from an olive oil bottle?
- 12.3 What is the white residue inside my glass oil bottle?
- 12.4 Is it safe to use bleach to clean an olive oil glass bottle?
- 12.5 My glass oil bottle has cloudy water marks on the outside — how do I remove them?
The Short Answer: How to Clean an Olive Oil Bottle Effectively
The most effective way to clean an olive oil bottle — especially a Glass Oil Bottle — is to rinse it with hot water immediately after use, then wash with dish soap and a bottle brush. For stubborn residue, fill the bottle with a mixture of hot water and a few drops of dish soap, shake vigorously for 30 seconds, let it soak for 15–30 minutes, and scrub with a long-handled brush. For dried or rancid oil buildup, a baking soda paste or white vinegar rinse removes grease far more effectively than cold water alone.
Most people underestimate how quickly olive oil residue turns rancid inside a bottle. Oil exposed to air starts oxidizing within hours, and once it coats the interior walls of a glass oil bottle, it creates a sticky film that attracts bacteria and imparts off-flavors to fresh oil. Cleaning promptly and thoroughly is not just about aesthetics — it directly affects the quality and safety of the oil you store next.
This guide walks through every cleaning scenario: everyday maintenance, deep cleaning after long storage, removing stubborn residue from decorative glass oil bottles, and drying techniques that prevent water spots and mildew.
Why Olive Oil Residue Is Harder to Clean Than Most People Think
Olive oil is composed primarily of monounsaturated fatty acids, with oleic acid making up roughly 55–83% of its content. These long-chain fats cling to glass surfaces through a combination of adhesion and static attraction, forming a thin but persistent film. Cold water does almost nothing to break this bond — fat molecules are hydrophobic, meaning they repel water. You need either heat, a surfactant (soap), or an alkaline agent like baking soda to cut through the residue effectively.
When olive oil sits in a glass oil bottle for extended periods, it undergoes oxidation, hydrolysis, and polymerization. Polymerized oil is essentially the same compound used in linseed oil-based paints — it forms a hard, varnish-like coating on the interior glass surface that is notoriously difficult to remove without abrasive cleaning methods. This is particularly common in decorative olive oil dispensers that sit on countertops and are refilled repeatedly without thorough cleaning between uses.
There are three stages of olive oil residue inside a glass bottle:
- Fresh film — Light, liquid coating; removed easily with hot soapy water in under 5 minutes.
- Oxidized residue — Sticky, slightly tacky film with a faint rancid smell; requires soaking and scrubbing.
- Polymerized buildup — Hard, yellowish-brown coating; may require repeated treatments with baking soda, vinegar, or even isopropyl alcohol.
Understanding which stage you're dealing with saves time and prevents frustration. Most routine cleanings involve fresh film or light oxidized residue. Polymerized buildup usually only appears in bottles that have gone weeks or months without proper washing.
Step-by-Step: Everyday Cleaning for a Glass Oil Bottle
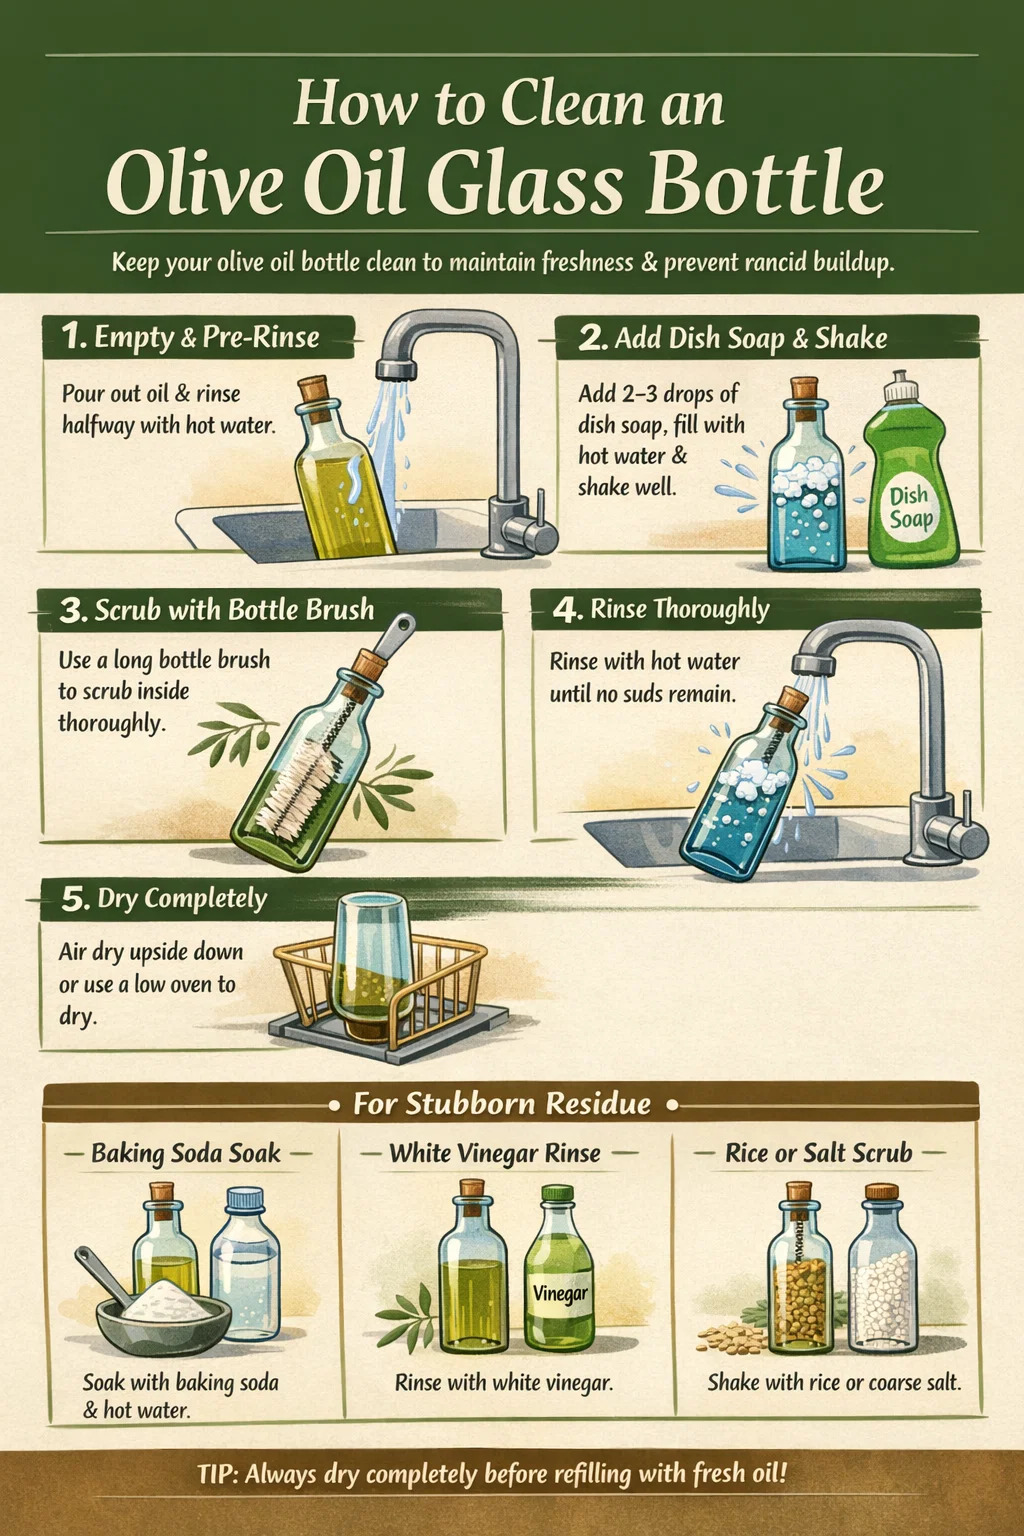
For routine cleaning after normal use, follow these steps. This process takes less than 10 minutes and keeps your glass oil bottle in good condition indefinitely.
Step 1: Empty and Pre-Rinse with Hot Water
Pour out any remaining olive oil. Do not pour it down the drain in large quantities — a small amount is fine, but larger volumes can clog pipes over time. Once emptied, immediately fill the bottle halfway with the hottest tap water available (ideally above 60°C / 140°F). Hot water softens the oil film and makes it significantly easier to remove. Shake gently and discard this rinse water.
This pre-rinse step is often skipped, but it reduces the total cleaning time by 30–40% by loosening the bulk of the oil layer before soap is introduced.
Step 2: Add Dish Soap and Shake
Add 2–3 drops of concentrated dish soap into the bottle. Dawn, Fairy, or any degreasing dish liquid works well — these are formulated specifically to break down fatty acids. Fill the bottle about one-third full with hot water, then stopper the opening with your thumb or the bottle's cap and shake vigorously for 30–60 seconds. The surfactants in the soap will emulsify the oil, breaking it into tiny droplets that can be rinsed away with water.
Step 3: Scrub with a Bottle Brush
For glass oil bottles with narrow necks — which is the majority of stylish kitchen dispensers — a long-handled bottle brush with flexible bristles is essential. Standard sponges or cloths cannot reach the interior walls, and you risk leaving residue behind that will turn rancid. Insert the brush, scrub the sides, bottom, and neck of the bottle thoroughly. Pay special attention to the shoulder area where the neck meets the body — oil tends to pool and thicken there.
If the mouth of the bottle is very narrow and no brush fits, use a combination of shaking with soapy water and a pipe cleaner wrapped in a small piece of cloth to reach the neck interior.
Step 4: Rinse Thoroughly
Rinse the bottle with hot water at least 3–4 times until no soap bubbles or suds remain. Any soap residue left inside will impart a soapy taste to your next batch of olive oil, and the surfactants can also accelerate oxidation. Tilt the bottle at different angles during rinsing to ensure water reaches all interior surfaces.
Step 5: Dry Completely Before Refilling
This step is frequently overlooked but critically important. Moisture inside an oil bottle can cause the fresh oil to emulsify slightly, encouraging microbial growth and accelerating spoilage. Turn the bottle upside down on a clean drying rack for at least 2–4 hours, or overnight if possible. Alternatively, place the bottle in a low oven (around 80°C / 175°F) with the opening facing down on a rack for 15 minutes to speed up drying. Do not use paper towels to dry the interior — fibers can get left behind.
Deep Cleaning: Removing Stubborn Oil Residue and Rancid Buildup
When a glass oil bottle has been sitting for a while or has visible discoloration and a strong off-smell, standard dish soap alone won't cut it. The following methods address oxidized and polymerized oil residue.
Baking Soda and Hot Water Soak
Baking soda (sodium bicarbonate) is mildly alkaline with a pH of around 8.3. This alkalinity helps saponify fatty acids — essentially turning them into soap — which can then be rinsed away. Add 1 tablespoon of baking soda to the bottle, fill with hot water, cap or cover, and let it soak for 30 minutes to 2 hours depending on how bad the buildup is. Then shake vigorously, scrub with a bottle brush, and rinse thoroughly.
For particularly stubborn cases, make a paste by mixing baking soda with just enough water to form a thick consistency. Use a bottle brush to work this paste against the interior walls, focusing on discolored or sticky areas. The mild abrasive action of baking soda particles, combined with its alkaline chemistry, cuts through oxidized oil much faster than soap alone.
White Vinegar Rinse
White vinegar (acetic acid, typically 5% concentration) is an excellent degreaser and deodorizer for glass surfaces. Fill the bottle about one-quarter full with undiluted white vinegar, swirl to coat all interior surfaces, and let it sit for 10–15 minutes. The acetic acid breaks down fatty deposits and neutralizes rancid odor compounds. After soaking, add a few drops of dish soap, fill with hot water, shake, scrub, and rinse multiple times.
Do not mix vinegar and baking soda inside the bottle at the same time as a cleaning strategy — the fizzing reaction is largely decorative and actually reduces the cleaning effectiveness of both agents by neutralizing each other. Use them separately in sequence if needed: baking soda soak first, full rinse, then vinegar treatment.
Uncooked Rice or Salt as a Scrubbing Agent
For bottles with narrow necks where a brush won't fit, add 2 tablespoons of uncooked white rice or coarse salt to the bottle along with hot water and dish soap. Swirl and shake the mixture for 1–2 minutes. The rice or salt granules act as an internal abrasive, scrubbing the interior walls as you shake. This technique is particularly effective for the shoulder and lower body of the bottle where oil tends to pool. Rinse thoroughly after — rice can leave starchy residue, so rinse until the water runs completely clear.
Isopropyl Alcohol for Polymerized Buildup
When the inside of a glass oil bottle has turned yellow or brown and developed a hard, varnish-like coating, isopropyl alcohol (70% or 90% concentration) is one of the few effective solvents. Pour a small amount into the bottle, swirl it around to dissolve the polymerized layer, and let it sit for 5–10 minutes. Then scrub and rinse with hot soapy water — multiple rounds may be needed. Always rinse very thoroughly after using alcohol, as any residue will contaminate your oil. Allow the bottle to air dry completely before refilling.
This method should be reserved for severe cases — most routine cleaning never reaches this point if the bottle is washed regularly.
Cleaning Methods Compared: Which Works Best for Glass Oil Bottles
The table below summarizes the most common cleaning methods, their effectiveness for different levels of residue, and their suitability for glass oil bottles specifically.
| Cleaning Method | Fresh Film | Oxidized Residue | Polymerized Buildup | Safe for Glass | Time Required |
|---|---|---|---|---|---|
| Hot water + dish soap | Excellent | Good | Poor | Yes | 5–10 min |
| Baking soda soak | Good | Excellent | Fair | Yes | 30 min–2 hr |
| White vinegar rinse | Fair | Good | Poor | Yes | 10–15 min |
| Rice + soap shake | Good | Good | Fair | Yes | 5–10 min |
| Isopropyl alcohol | Good | Excellent | Excellent | Yes | 10–20 min |
| Cold water only | Poor | Poor | None | Yes | N/A |
Can You Put a Glass Oil Bottle in the Dishwasher?
This is one of the most common questions about cleaning olive oil dispensers. The answer depends on several factors: the bottle's construction, whether it has any decorative elements, and the quality of the glass itself.
Plain, undecorated glass oil bottles are generally dishwasher-safe, provided they are thick-walled borosilicate glass or standard tempered glass. The high heat and water pressure of a dishwasher cycle (typically 65–75°C / 149–167°F) is effective at removing fresh oil film. However, there are important caveats:
- Bottles with painted or screen-printed labels, metallic accents, or wax coatings should never go in the dishwasher — the heat and detergent will degrade these finishes within a few cycles.
- Narrow-neck bottles often don't get adequately cleaned in dishwashers because the water jets cannot reach the interior properly. Residue remains on the inner walls even after a full cycle.
- Silicone pourers, cork stoppers, and plastic caps should always be removed before dishwashing — these components degrade at high temperatures.
- Even if a glass oil bottle survives dishwasher cleaning, the repeated thermal cycling can weaken the glass over time, particularly at the neck where the glass is thinnest.
For most glass oil bottles used in home kitchens, hand washing is the safer and more thorough option. It takes only a few minutes more and ensures every interior surface is properly cleaned.
How to Clean Different Types of Glass Oil Bottles
Not all glass oil bottles are built the same. The neck width, bottle shape, stopper type, and any decorative elements all affect how you should approach cleaning.
Narrow-Neck Dispensers and Cruets
These are the most common type of olive oil glass bottle used at the dining table. The opening is typically less than 2 cm in diameter, making it impossible to insert a standard sponge or wide brush. Use a narrow bottle brush (look for ones marketed for cleaning straws or espresso equipment) combined with the hot water and soap shake method. The rice-and-soap shake technique is also highly effective for these bottle shapes. Change the cleaning water 2–3 times during the process to ensure fresh soap is working throughout.
Wide-Mouth Glass Oil Bottles
Wide-mouth bottles are much easier to clean because you can reach all interior surfaces with a standard bottle brush or even a folded cloth. These are commonly used in professional kitchens and restaurants. Clean them using the standard hot water and dish soap method described above, scrubbing thoroughly with a brush. Because the opening is larger, these bottles also dry faster — simply invert them on a rack and they'll be fully dry within 1–2 hours.
Decorative and Etched Glass Oil Bottles
Decorative glass oil bottles often feature etched patterns, frosted finishes, painted exteriors, or ceramic labels. The exterior decoration doesn't change how you clean the interior — the same methods apply inside. However, avoid soaking the entire bottle in water or cleaning solutions if the exterior has painted or glued labels, as prolonged moisture exposure can cause them to peel or fade. Clean the interior normally and wipe the exterior with a damp cloth.
For etched glass, avoid harsh abrasives on the exterior as they can scratch the surface and dull the etching over time. The interior can still be treated with baking soda or vinegar without any issue.
Recycled Glass Oil Bottles
Many artisanal and eco-conscious kitchen brands produce olive oil dispensers from recycled glass, which typically has a greenish or blue-tinted hue and slightly irregular walls. These bottles are structurally sound but may be more sensitive to sudden temperature changes — a phenomenon called thermal shock. Always use warm-to-hot water rather than boiling water, and don't pour hot water into a cold bottle or cold water into a hot one. This prevents stress fractures from developing in the glass wall.
Removing the Stopper, Pourer, and Cap — and Cleaning Them Separately
The stopper, pouring spout, or cap of an olive oil bottle deserves as much attention as the bottle itself. These components come into direct contact with oil every time you pour, and they accumulate residue quickly — yet they're often forgotten during cleaning.
Here's how to handle the most common types:
- Silicone pourers: Remove completely, wash with warm soapy water, rinse, and allow to air dry before reattaching. Silicone is nonporous and resists bacterial growth, but oil residue can still accumulate on the surface and around the small holes.
- Cork stoppers: Do not soak cork in water — it swells and can become misshapen, and it may also absorb soap flavors. Wipe the exposed end with a damp cloth and allow it to dry completely. If a cork stopper develops visible mold, replace it rather than trying to clean it.
- Stainless steel spouts: These can be soaked in hot soapy water and scrubbed with a small brush. White vinegar helps remove any mineral deposits that accumulate around the spout opening.
- Plastic caps: Hand wash with dish soap and warm water. Dishwasher-safe plastic (look for the recycle symbol with "5" — polypropylene) can go in the top rack, but many plastic caps will warp at dishwasher temperatures.
Never reassemble the pourer or stopper until both it and the bottle are fully dry. Trapping moisture between a sealed stopper and the bottle interior creates conditions favorable for mold and bacterial growth, even inside an oil environment.
How Often Should You Clean an Olive Oil Bottle?
The correct cleaning frequency depends on how you use the bottle and how long you keep oil in it. Here's a practical framework:
- After every use (if the bottle is being emptied and refilled frequently): A quick hot-water-and-soap wash before refilling prevents old oil residue from mixing with fresh oil and turning it rancid faster.
- Every 2–4 weeks (for regularly used dispensers): Even if you're continuously topping up the bottle, give it a full wash every few weeks. Oil near the bottom and on the walls oxidizes at a different rate than the fresh oil on top.
- Before storing for any period longer than 2 weeks: If you're going on vacation or simply won't be using the bottle, empty and fully clean it rather than leaving oil inside. Oil left in a warm kitchen can go completely rancid within 4–6 weeks once opened.
- Immediately if you notice off-smells: A rancid or paint-like smell from your olive oil bottle is a clear sign that old oil has oxidized on the interior walls. Clean it right away using the deep-cleaning method with baking soda or vinegar.
A general rule used by professional cooks: never top up an olive oil bottle without cleaning it first. Adding fresh olive oil to a bottle with rancid residue immediately begins contaminating the new oil. The off-flavor compounds from oxidized oil transfer extremely quickly — even a small amount of rancid residue can make a full bottle of fresh olive oil taste noticeably worse within days.
Drying and Storing a Glass Oil Bottle After Cleaning
Proper drying is not just about avoiding water spots on the outside — it's about ensuring no moisture remains inside before you reintroduce oil.
Air Drying (Recommended)
Place the bottle upside down on a clean drying rack with the opening facing down. This allows gravity to help drain any remaining water droplets. In a typical kitchen environment at around 20°C / 68°F, a glass oil bottle takes between 2 and 6 hours to dry completely, depending on the bottle's size and neck width. Narrow-neck bottles take longer. Do not cap or stopper the bottle during this time.
Oven Drying (Faster)
Place a clean, rinsed bottle right-side up on the oven rack (or upside down on a baking sheet) and heat at 80–100°C / 175–210°F for 15–20 minutes. This evaporates interior moisture quickly and also has a mild sanitizing effect. Allow the bottle to cool completely before touching it or adding oil — glass retains heat for longer than you might expect. Do not use this method for bottles with any non-glass components still attached (silicone pourers, rubber seals, cork stoppers).
Storing a Clean, Empty Bottle
If you're not going to refill the glass oil bottle right away, store it in a cool, dry cupboard with the stopper slightly ajar or removed entirely. This prevents moisture buildup from condensation inside the bottle. Avoid storing it near heat sources like the stovetop or oven, as repeated heat exposure can cause micro-cracks in glass over time, particularly at the neck and base.
Tips for Keeping a Glass Oil Bottle Cleaner for Longer
Prevention reduces the effort required for each cleaning session considerably. These habits make a meaningful difference:
- Wipe the spout after every pour. Oil that drips down the exterior of the bottle or collects on the spout will oxidize and harden within days. A quick wipe with a dry cloth or paper towel after each use keeps the exterior clean and prevents the residue from migrating into the neck of the bottle.
- Keep the bottle out of direct sunlight. UV light accelerates olive oil oxidation, which means the oil inside the bottle turns rancid faster and the residue left on the walls oxidizes more quickly too. Store your glass oil bottle in a shaded area or inside a cupboard.
- Don't overfill. Keeping the bottle at about 75% capacity reduces the surface area of oil in contact with air inside the bottle, slowing oxidation of both the oil and the interior wall residue.
- Use a bottle with a tight-sealing stopper. Oxygen is the primary driver of oil oxidation. A pourer or stopper that creates a good seal significantly extends the life of your oil and reduces the rate at which residue builds up inside the bottle.
- Choose dark-colored glass when possible. Amber or dark green glass oil bottles block a significant portion of light — research shows that dark glass can reduce the rate of photo-oxidation in olive oil by up to 70% compared to clear glass. Slower oxidation means less rancid residue and less frequent deep cleaning.
Frequently Asked Questions
Can I reuse an olive oil glass bottle without cleaning it first?
Technically yes, but it's not advisable. Old oil residue clinging to the walls begins to go rancid relatively quickly, and that rancidity transfers to any fresh oil you add. Even if the fresh oil is of excellent quality, it will start to taste off within days. For best results, always clean the glass oil bottle before refilling it.
How do I get rid of the rancid smell from an olive oil bottle?
Rancid oil smell comes from volatile fatty acid breakdown products, particularly short-chain aldehydes and ketones. White vinegar is very effective at neutralizing these odors — fill the bottle with a solution of 1 part vinegar and 3 parts warm water, soak for 30 minutes, then rinse thoroughly with hot water and dish soap. Baking soda soak also works well. In very stubborn cases, a small amount of activated charcoal powder inside the bottle with warm water can help absorb the odor compounds.
What is the white residue inside my glass oil bottle?
White or cloudy residue is usually a combination of water mineral deposits (limescale) and partially solidified saturated fat. Olive oil contains a small percentage of saturated fatty acids — primarily palmitic acid — that can solidify at cooler temperatures and appear as a white or waxy deposit on the interior glass surface. This is harmless but does indicate the bottle needs cleaning. A white vinegar soak dissolves both mineral deposits and the waxy fat residue effectively.
Is it safe to use bleach to clean an olive oil glass bottle?
Bleach (sodium hypochlorite) is not recommended for cleaning oil bottles. Bleach does not break down fats — it's primarily effective against bacteria and mold, not grease. More importantly, even trace amounts of bleach residue left in the bottle will contaminate your olive oil and create harmful chlorinated compounds when it reacts with the oil's fatty acids. Stick to dish soap, baking soda, vinegar, and for severe cases, isopropyl alcohol, all of which rinse completely clean and do not leave hazardous residue.
My glass oil bottle has cloudy water marks on the outside — how do I remove them?
Cloudy water marks on glass are typically hard water mineral deposits (calcium and magnesium carbonates) left behind as water evaporates. Wipe the exterior of the glass oil bottle with a cloth dampened in undiluted white vinegar, let it sit for 1–2 minutes, then wipe clean and buff dry with a lint-free cloth. For severe buildup, a commercial limescale remover designed for glass surfaces also works well. Dry the exterior immediately after cleaning to prevent new water marks from forming.
Recommended Products


- PRODUCT
- Glass Storage Jar
- Glass/Stainless Steel Drinking ware
- Kitchen Seasoning Containers
- Home Decoration
- QUICK LINKS
- Products
- About Us
- Manufacture
- ODM/OEM
- News
- Contact Us
- CONTACT US
-
-
 7 Crystal Boulevard xi’an Feng Town, Baoying County,Jiangsu, China.
 -
 WhatsApp: +86-18083783456
 -
 +86-18083766162
+86-18083783456
+86-15895746638
+86-0514-8866-8898
-
 julia@nchousewares.com
Jack@nchousewares.com
-
- CONTACT

